• Skip to primary navigation
  • Skip to main content
  • Skip to footer
  • Home
  • Patterns
  • Books
  • About
  • Blog
  • Newsletter
  • Classes

Mary Jane Mucklestone

Hand Knitting Blog & Knitting Patterns

knitting

Oorik Pattern Reveal!!!

September 2, 2017 by Mary Jane 3 Comments

Oorik_MaryJaneMucklestone

I’m pleased as punch to reveal my contribution, Oorik, to the great new book A Year of Techniques by the ever-clever duo at Arnall-Culliford Knitwear, Jen and Jim.

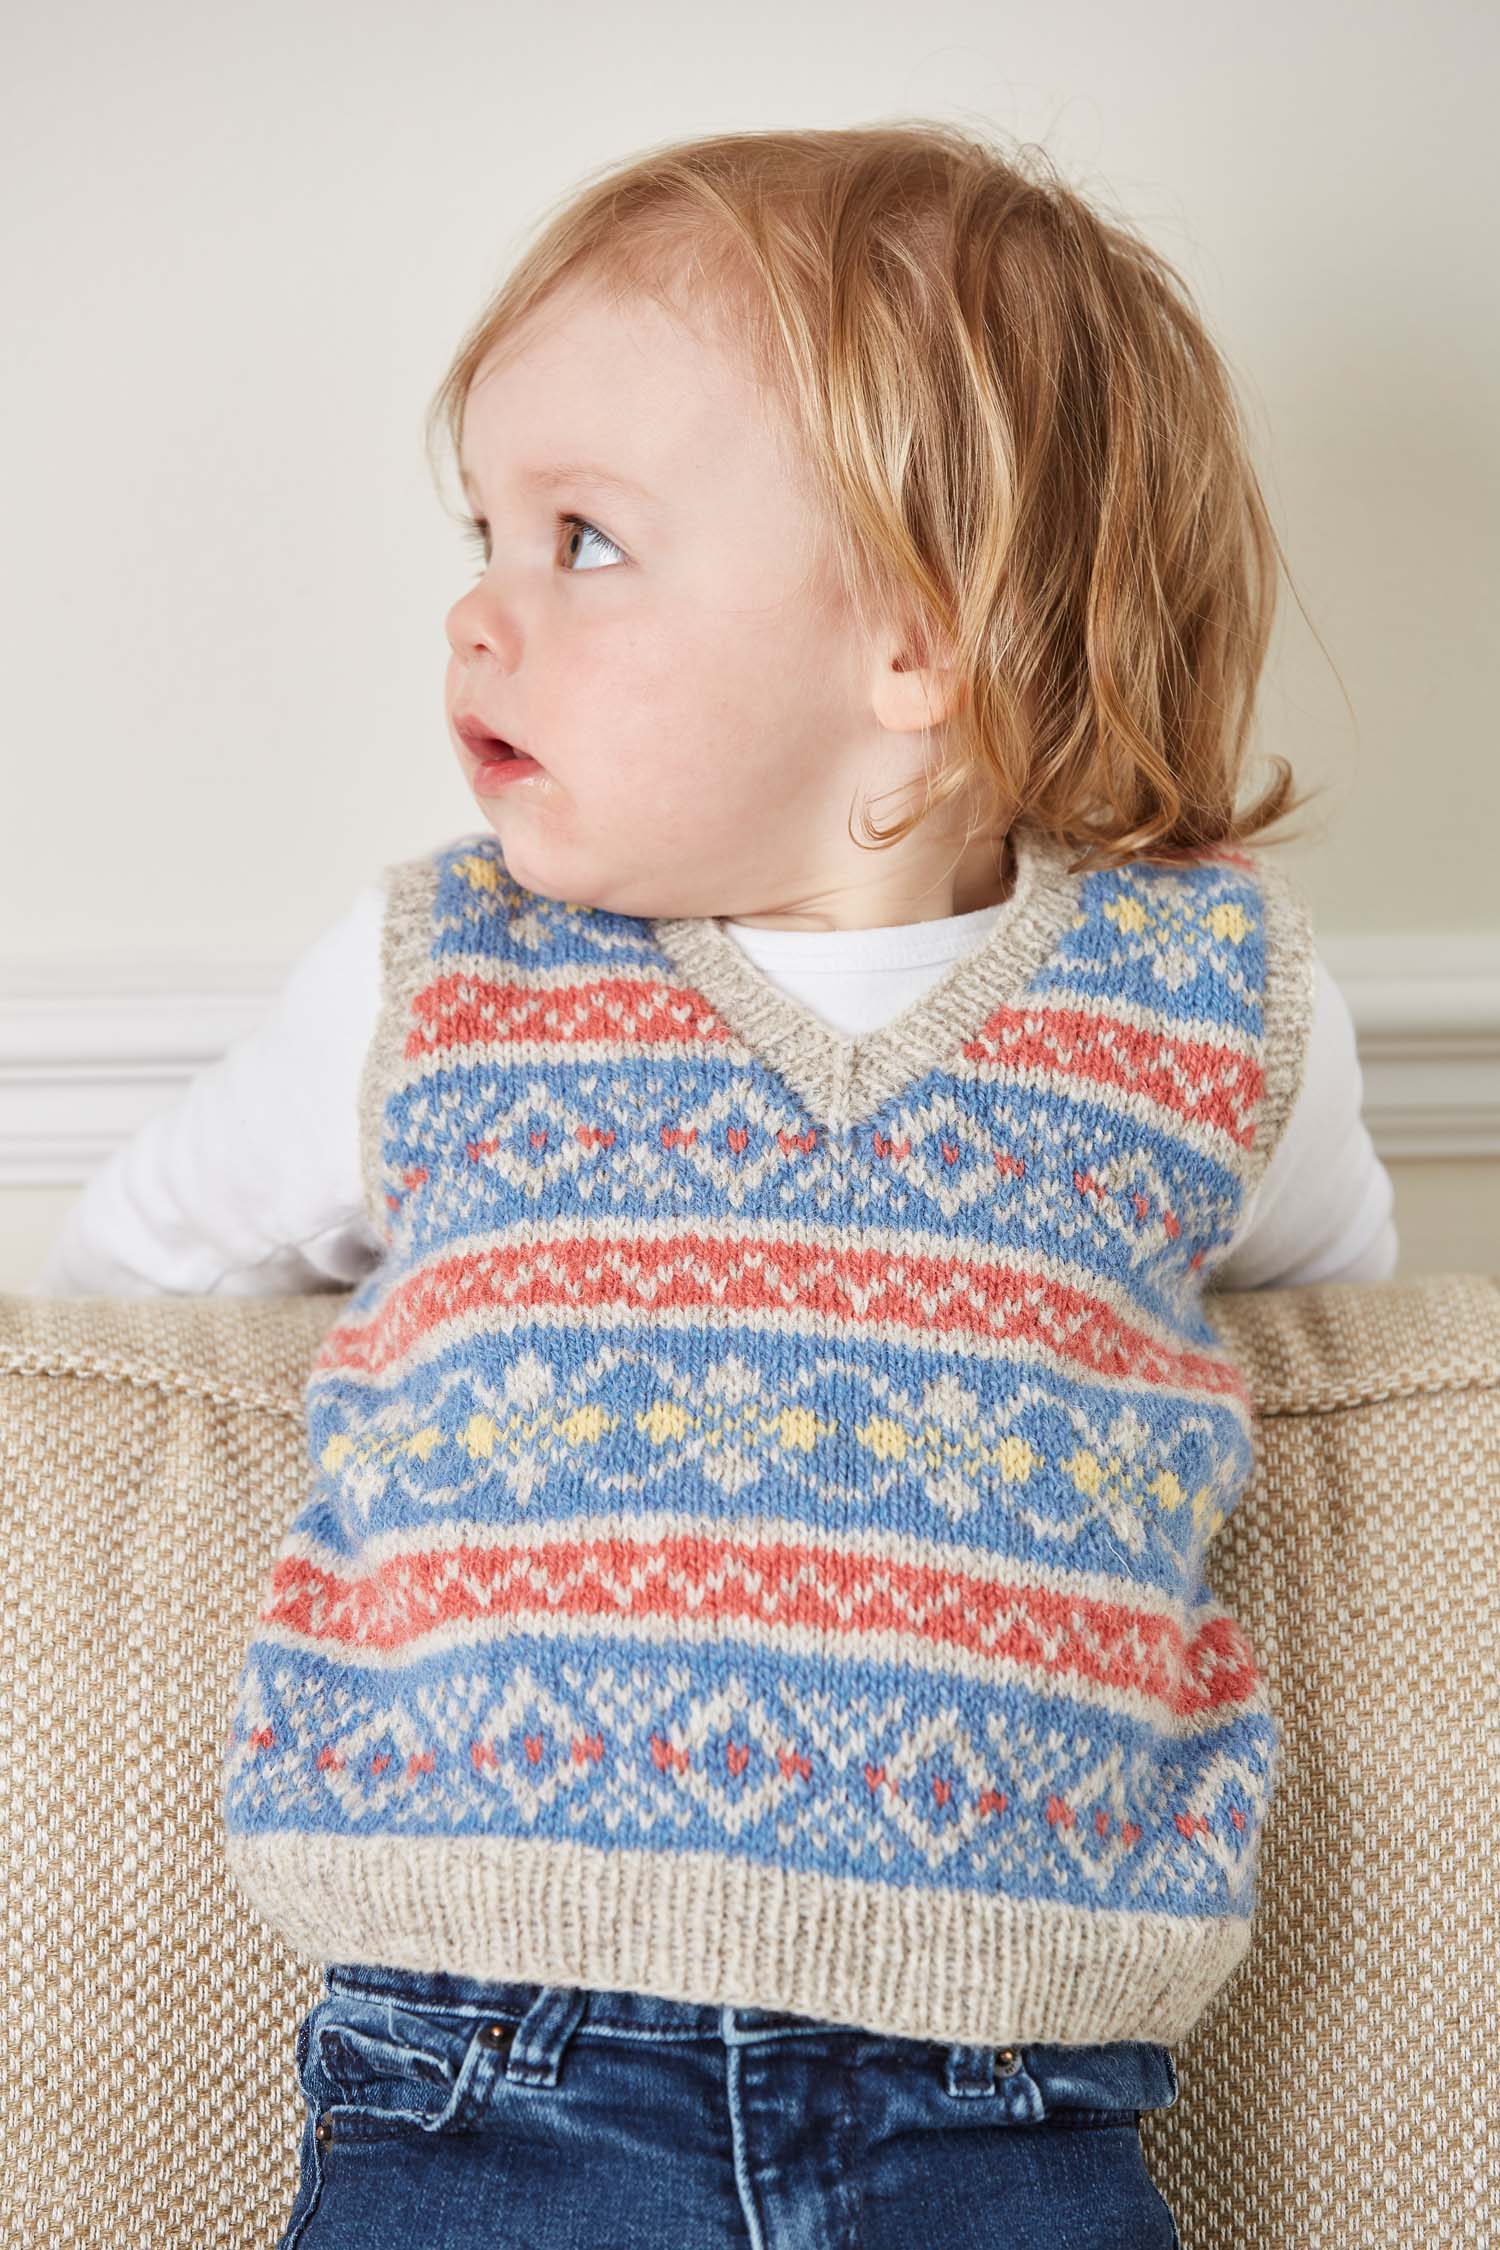
Oorik is a sweet vest for the toddler in your life, the word Oorik which means “small person” in old Shetland dialect.

Knit in the round with just four colors. Of course never more than two are used in a single round. The sweet vest features two border patterns alternated with a single peerie pattern. I feel the colors are suitable for all genders, but they are easily substituted for you to dream up your own color scheme, which would be really fun. I can’t wait to see what folks come up with.

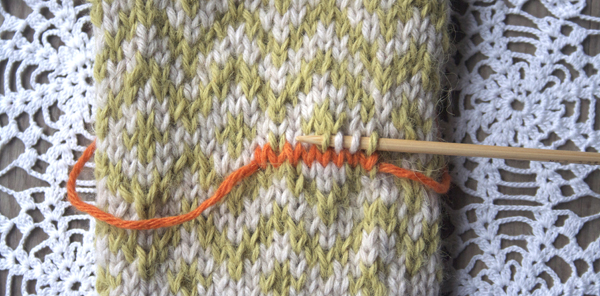
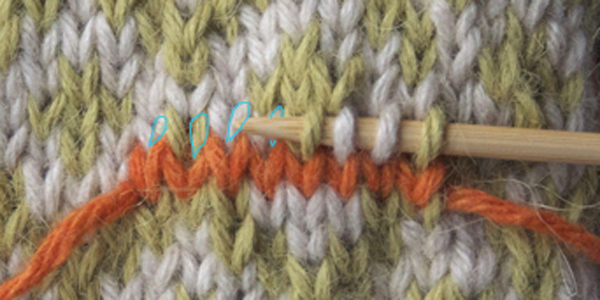
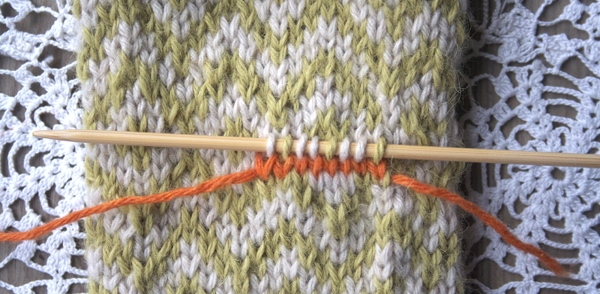
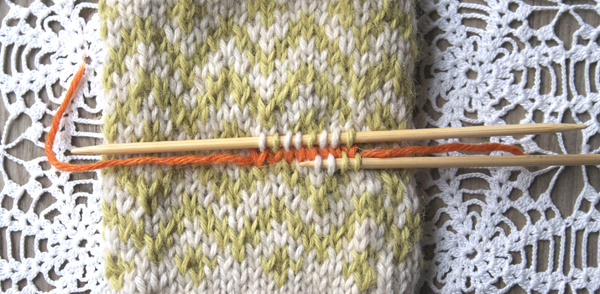
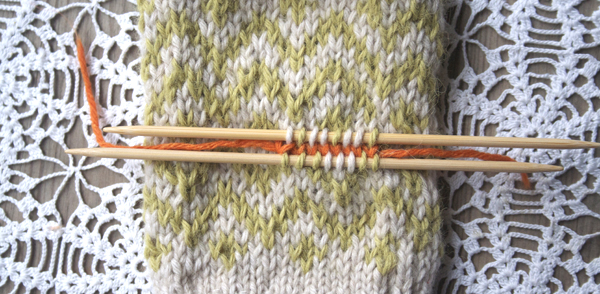
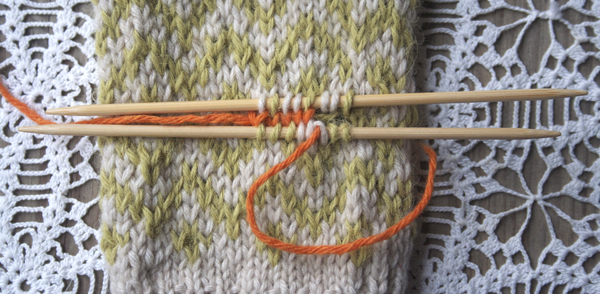
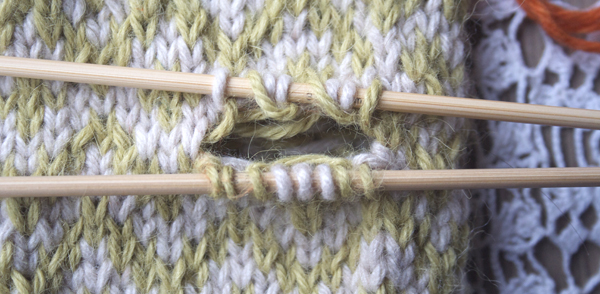
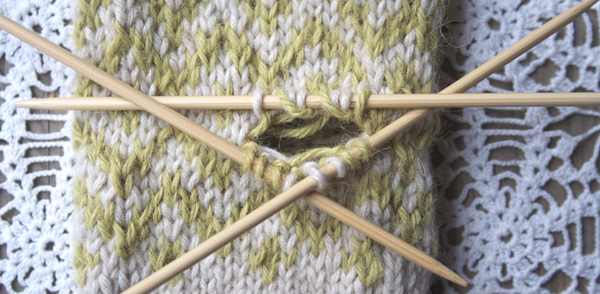
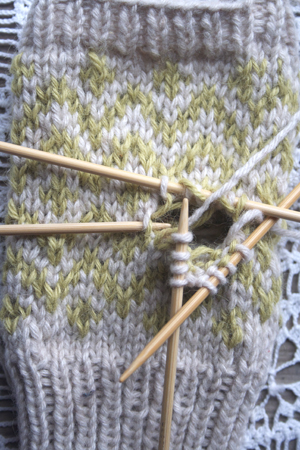
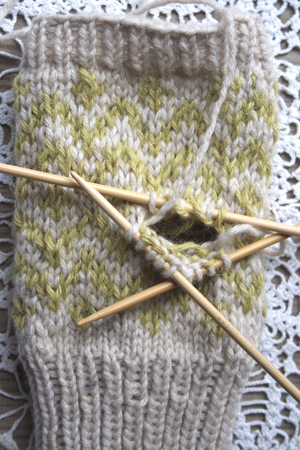
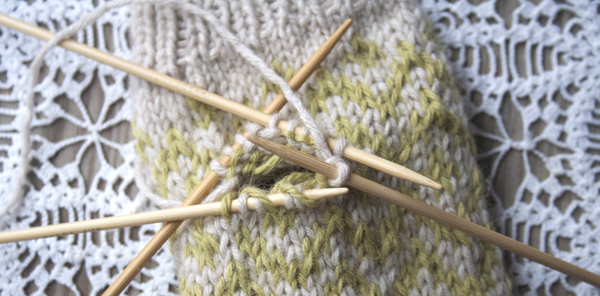
Steeking is the technique you’ll learn with Oorik. As with every project in this stellar book there is a technique to learn and master. Jen and Jim have made a video tutorial which will be go live on Mason-Dixon Knitting on 1st Feb 2018, the same date as a KAL will begin.

A Year of Techniques (with complimentary ebook) costs £19.99 plus shipping, or you can buy the ebook only for £19.99.

Visit Arnall-Culliford Knitwear to purchase.

A kit with the yarn will soon be available in their shop as well.

I hope you’ll join us for the KAL in February…if you can wait that long!

If I ever need cheering up I look at the many photos of Jen and Jim’s niece the vest. I know full well how challenging photographing a toddler can be – she is the cutest!!!

jen_ac_bath_138 jen_ac_bath_101 jen_ac_bath_097 jen_ac_bath_155 jen_ac_bath_157 jen_ac_bath_162 jen_ac_bath_125 jen_ac_bath_141

Filed Under: Patterns Tagged With: apparel, artisinal, color, colorwork, colour, fiber, fibre, handknitting, handmade, knit, knitting, knitting pattern, Mary Jane Mucklestone, Oorik, ravelry, shetland, steeking, stranded knitting, tutorial, Vest, wool, yarn

Knitting Poetry

April 1, 2015 by Mary Jane 5 Comments

Neruda_Bird

April is National Poetry Month. Inspired by a favorite poem, I knit a little coaster to celebrate the season. I used motif No.52 from my book 150 Scandinavian Motifs. Instead of knitting it stranded, I tried my hand at intarsia. I’m a little rusty and just off the needles it’s a bit bumpy, but I think it will calm down with a nice blocking.

I actually saw a cardinal today, sitting on a branch just outside my window, sweetly singing. The birds are different here in my new home in the city. I am making new friends and learning new songs.

Spring
Pablo Neruda

The bird has come
to give the light:
from each trill of his
water is born.

And between water and light that unroll the air
now the spring is inaugurated,
now the seed knows that it has grown,
the root is portrayed in the corolla,
at last the eye lids of the pollen unclose.

All this was done by a simple bird
from a green branch.


La Primavera
Pablo Neruda

El párajo ha venido
a dar la luz:
de cada trino suyo
nace el agua

Y entre agua y luz que el aire desarrollan
ya está la primavera inaugurada,
ya sabe la semilla que ha crecido,
la raíz se retrata en la corola,
se abren por fin los párpados del polen.

Todo lo hizo un pájaro sencillo
desde una rama verde.

What’s your favorite spring poem?

You want this book! 
Full Woman, Fleshy Apple, Hot Moon: Selected Poems of Pablo Neruda
Translated by Stephen Mitchell
Harper Collins
ISBN 0-06-092877-8

For the coaster I used Quince & Co. Lark yarn. In egret, delft and leek. More specs on my Ravelry  page.


Filed Under: Knitting Tagged With: colorwork, garter stitch, intarsia, knitting

It is Still Winter!!!!

March 12, 2013 by Mary Jane 5 Comments

skiing

For my birthday I got cross-country SKIS + boots + poles which = FUN! So I’m still rooting for another snowstorm, though I am way in the minority around these parts. Sure some flowers would be nice, I can almost smell them when the sun comes out, and a robin or two singing would be cheery…but new snow would be even more fun for me now!

I’m outfitted in the Lopapeysa I got last summer in Iceland. Perfect, zips both ways. I’ve got my overalls on so my pants won’t fall down. I’m wearing my Elfin Peak Hat…and a stash busting scarf I made a while back with pom poms. Pom poms, as you may know, make you ski faster.

Of course you can make a scarf like this out of just about anything. I’m sure you can just whip this baby up without instructions, but sometimes you just don’t want to THINK AT ALL…Just Make!

For a scarf that measures 5.5 inches(14cm) wide and 43 inches(109cm) long – 45 inches(114cm) when measured with the pompoms –  here’s what I did:

Yarn: 1 skein Bartlettyarns 2 ply 100% Maine Wool [4oz /200yds (114g/183m)] ; Color “Bracken”. Assorted colors of worsted  weight yarn for pom poms 10 x 9yd (8.25m) lengths.
Needles: US8 (5mm) 24″ (60cm) or 32″ (80cm) circular needle – due to large number of stitches.
Notions: tapestry needle, 1 3/4″ (4.5cm) pom pom maker if desired.

POM POM HAPPINESS SCARF

Cast on 154 stitches. Knitting flat, knit every stitch every row for garter stitch.

Knit 48 rows.

Bind Off. Weave in ends.

Make 10 – 1.5″ (4cm) pompoms…any color you like! Leave the yarn that you tie the pom pom together with  long, and use those ends to sew them to the edge of the scarf – 5 on each end.

I like a really chubby pompom so I used about 9 yards (8.25m) for each. I use the “easy wrap” pom pom maker from Susan Bates and I trim my pom poms closely….a little obsessively.

Now you’re ready – to the woods!

pompom scarf

You can have this pattern as a Free Ravelry Download if you can’t keep those complex directions in your head!

Filed Under: Knitting Tagged With: design, garter stitch, knitting, knitting pattern, Lopapeysa, Maine, Maine wool, scarf

Algjör heimskautatöffari *

August 16, 2012 by Mary Jane 2 Comments


Today I jumped in a fjord.

Önundarfjordur to be exact.

The water is very clean and glacially fresh. A very pale blue.
I’m feeling kind of proud and happy!

And just so you know, we are getting some serious knitting done.

* translation: total arctic badass

more iceland at my friend and fellow instructor Gudrun’s here:
http://www.theshetlandtrader.com/blog/

Filed Under: Events Tagged With: fjord, Iceland, knitting, West Fjords

All Thumbs

January 16, 2012 by Mary Jane 25 Comments

Ah the beautiful Afterthought Thumb on my Muckle Mitts! Technically this isn’t an afterthought, since we did think about it by knitting waste yarn into the spot where we’ll make the thumb later, See my  last post “Waste Yarn, What Yarn?”. When I learned this thumb, I found picking up the stitches around the waste yarn confusing.

So let’s go through it step by step.

[Above] Here we see the 8 stitches of waste yarn knit in between Rnd 11 and Rnd 12 of the chart.

Using one of  my smaller needles I’ve picked up four stitches  above the waste yarn, picking up the Right Hand leg of each  stitch. Picking up the Right Hand leg of the stitch will mount the stitch correctly on the needle, handy when we get around to knitting it.

[Above] Here’s a close up, see the outlines of the Right Hand leg of the stitch…now of course the point of the needle is obscuring the next stitch that we need to pick up…the difficult thing about still photos..but the turquoise outlines indicate the Right Hand leg of the stitches we will pick up.

Note: It is not the end of the world if you don’t get the correct leg of the stitch, you’ll be able to compensate when you knit it later. The worst thing that can happen is that the stitch will be twisted, which won’t really matter in the great scheme of life.

[Above] Now  I’ve got all 8 stitches positioned on the needle.

Picking up stitches below waste yarn on afterthought thumb

[Above] I’ll leave that needle in place and pick up 8 stitches from below the waste yarn. Again, I’m picking up the Right Hand leg of each stitch, so they will all be positioned correctly for knitting. I’ve got 3 stitches on the needle and I’m just picking up the 4th stitch with the tip of the needle.

Afterthought Thumb with all stitches picked up

[Above] Ok – 8 stitches each on both needles. Next we”ll remove the waste yarn

Afterthought thumb removing waste yarn

[Above] To remove the waste yarn un-pick the orange stitches….sort of slide the orange yarn out. I use another needle to kind of yank it gently out. Like chimpanzees use a stick to get ants from an anthill…a little like that anyway

Afterthought thumb with waste yarn removed

[Above] Here we go, the waste yarn is all the way out, leaving a gaping hole, but hello, all the stitches are safe and secure…even those wonky looking chartreuse ones. As frightening as they look they are fine, we’ll deal with them later.

stitches on needle with waste yarn removed closeup

[Above] Here are those scary stitches up close. The reason the chartreuse ones look so weird, is because the yarn we see at this point is both the stitch and the float. Don’t think about it too much or your head will ache, just trust me – when we knit them everything will be perfect.

[Above] Now we need to put the lower stitches on two needles so we can begin knitting. We’ll name our needles: Needle #1 Lower Right, Needle #2 Lower Left, Needle #3 Up Top. Time to knit!

[Above Left] Using my Main Color yarn, in this case Natural White, I’ve knit across Needle #1 and just finished knitting across Needle #2.

Needle #2 is in such a crazy perpendicular arrangement to facilitate the next step…

At the corner here, between Needle #2 and Needle #3  we’ll pick up a stitch. Insert the tip of your working needle under a stitch or two of the body of the mitt, in the corner between Needle #2 and Needle #3 – knit a stitch onto Needle #2. Sometimes I find it easier to use a spare needle  as shown, to knit this “picked up stitch, and then place the stitch back on needle #2.

[Above Right] We now have 5 stitches on Needle #2.

Afterthought thumb picking knitting first round

[Above] Time to knit Needle #3. We’ve turned the work,  Needle #3 is on the bottom of the picture now. I’ve knit the first stitch..but…Horrors! The next stitch to knit looks so messy!

picking up wonky looking stitches on afterthought thumb

[Above] Not to fear,  just knit that wonky Contrast Color stitch. See the new stitch on the Right Hand Needle? It’s fine and dandy.

[Above] I’ve knit all the way across Needle #3. See? Not wonky. Pretty pretty!

[Above] Now, pick up the corner stitch between Needle#3 and Needle #1,  just like you did before. If you’re using an auxiliary needle, make sure the stitch goes back onto needle #3.

We have 4 stitches on Needle #1, 5 stitches on Needle #2 and 9 stitches on Needle #3 for a total of 18 stitches.

afterthought thumb first round completed

[Above] Okey Dokey! I’ve knit all the way around the thumb opening once. We’re looking at our thumb right side up again, with Needle #3 at the top.

  • Beginning ribbing of afterthought thumb
  • afterthought thumb finished

[ Above Left] Now it is time to begin ribbing. We’ll work a K1 P1 rib for 5 rounds and then cast off in the rib pattern.

[ Above Right] Done – Ta da!

That wasn’t so hard now was it? Just knit it is my suggestion, don’t think about it too much before hand and you’ll be fine. Too much thinking and worrying is paralyzing and damn it – your hands are getting cold!

Muckle Mitts

Want a tutorial for eliminating holes in the corners of your afterthought thumb? Read:

Holes! Horrors!!!

Filed Under: Knitting Tagged With: afterthought thumb, knitting, technique

A Gift for You!

January 4, 2012 by Mary Jane 20 Comments

On Christmas Eve, the wonderful Kate Davies offered a free gift to her loyal readers. A Muff! I was flattered to find in my honor! A Mucklemuff!  Imagine! She used pattern motif #172 from my book 200 Fair Isle Motifs. She used the book just as it should be used, as a jumping off point for her own ideas….she took the allover arrangement and lengthened it…but after you read this run over an read what she has to say, the patten is free for a couple more days.

I imagined that I’d get my little gift to you my dear readers on New Year’s Day, but all I could manage was the knitting and the pictures…the rest took me a bit but we’re all good to go now! I also used pattern motif #172 but I flipped it a little to make a mirror image. I chose fingerless mitts because my hands are always cold in Seattle, but full mittens are just too hot. Fingerless mitts are just the ticket. I knit the crazy bright ones first, I was inspired by the mounds of Tulips for sale at the Pike Place Market.   A burst of spring in the dead of winter!

Understanding that I don’t always feel like being that cheerful or conspicuous, I dug through my stash and came up with the Red-Violet ones, Rødlilla  in Norwegian. I’ve been in a Norwegian mood, spending the winter in Seattle, taking nips of Linie Aquavitt to keep the damp at bay. So I used Dale of Norway Heilo and Falk both.

I’ve been spending time with my little sister which has been lots and lots of fun. She is a vibrant glowing good natured being,  and always willing to be a model on the spur of the moment! You’d never know her hands were covered with paint 20 minutes before we took the pictures. She chose the colors for the third pair, diving into my stash and choosing natural and a pale chartreuse. Both yarns are Classic Elite; Princess and Inca Alpaca. They compliment each other, the alpaca giving the green a slighty seaweedy look.

I’m especially happy how all the mitts look great with the camel hair coat I found for my mom. They each lend a totally different feel to it.

So download the pattern here and attack that stash of yours!

Free until January 16th,  2012!

Filed Under: Knitting Tagged With: fair isle, handknitting, knitting, knitting pattern, mittens, mitts, stranded

« Previous Page
Next Page »

Before Footer

Footer

  • Facebook
  • Instagram
  • Pinterest
  • Twitter
  • YouTube

Mary Jane Mucklestone © 2020