• Skip to primary navigation
  • Skip to main content
  • Skip to footer
  • Home
  • Patterns
  • Books
  • About
  • Blog
  • Newsletter
  • Classes

Mary Jane Mucklestone

Hand Knitting Blog & Knitting Patterns

yarn

Cushing Cowl

February 20, 2020 by Mary Jane 1 Comment

I love a cowl. Cozy and warm! And they won’t blow off or strangle you in the wind, but rather stay put and do their job.

Say hello to Cushing Cowl, inspired by the diagonal knitting of Maine fiber artist Katharine Cobey. I was scheduled to teach my Contemporary Stranded Knitting class at the Farnsworth Museum in Rockland Maine, who are having an exhibit of Katharine’s work. Wanting to add a little of her influence, I got to wondering how to apply her ideas about diagonals to stranded colorwork. I went a bit wild in the process, making zigzags, arrows, chevrons and diamonds that all stemmed from one little pattern repeat.

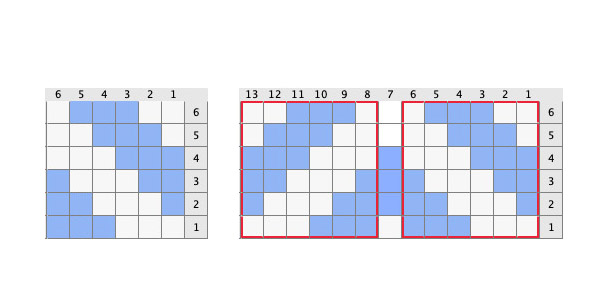
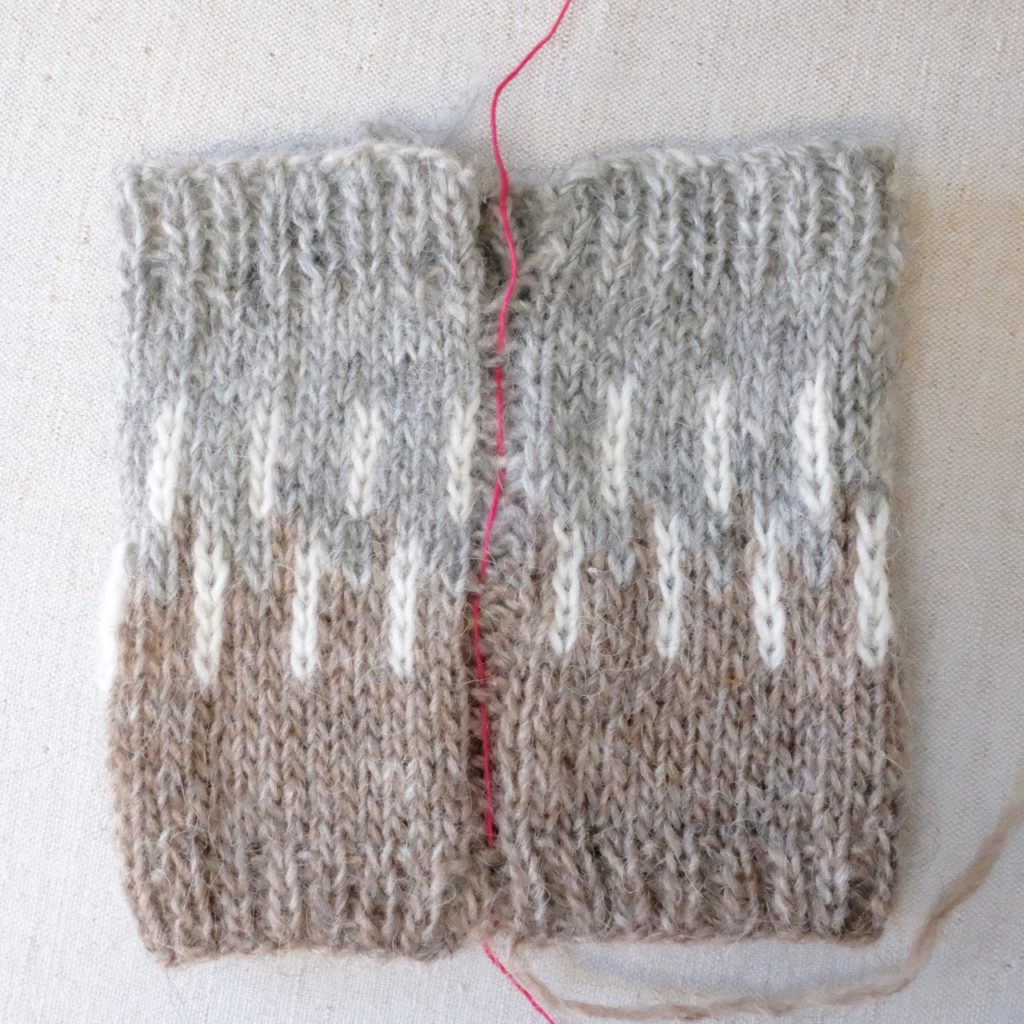
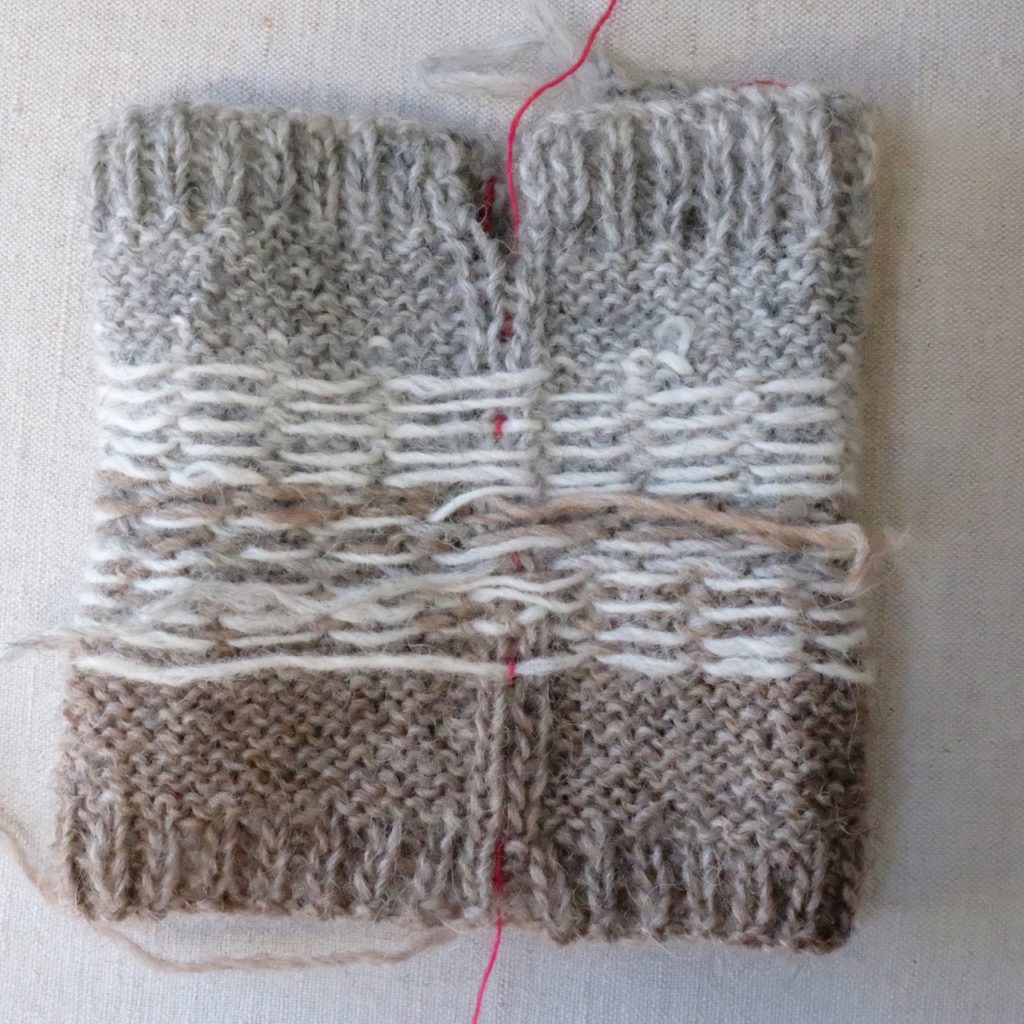
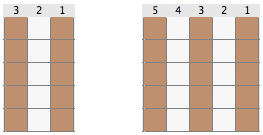
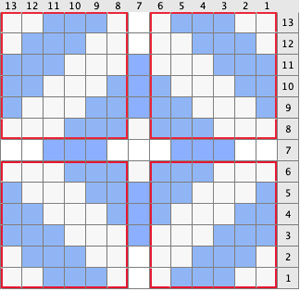
I began by playing around with diagonal lines, and settled on a 6 stitch x 6 row, diagonal pattern – 3 stitches of each color marching to the left. I flipped the motif horizontally to see what would happen. I discovered that if I added another column of stitches, I could make an arrow shape (above right) I’ve outlined the original 6×6 pattern in red so you can see. Next I flipped that whole new bit down, and added a row to make a diamond shape! That’s how it starts. The possibilities are endless!

I wanted a graphic look for my cowl, so I dove into my stash and came out with two skeins of local Maine based, Quince & Co. Lark, worsted weight yarn in Pea Coat, a nice dark navy for the Main Color. I wanted to pair it with an off-white. I didn’t have a full skein of anything, but found a couple of partial white balls, Audouin, sort of an oatmeal color, and a little ball of Egret, a bright white.

Necessity is the mother of invention, I used them both! Plus, I think having the two slightly different whites are what really make these solid colors work so nicely. The effect is very subtle, but so much more lively than if I had just used one contrast color.

MJM iat the town landing in Falmouth Maine, wearing Cushing Cowl and Dash Happy Hat

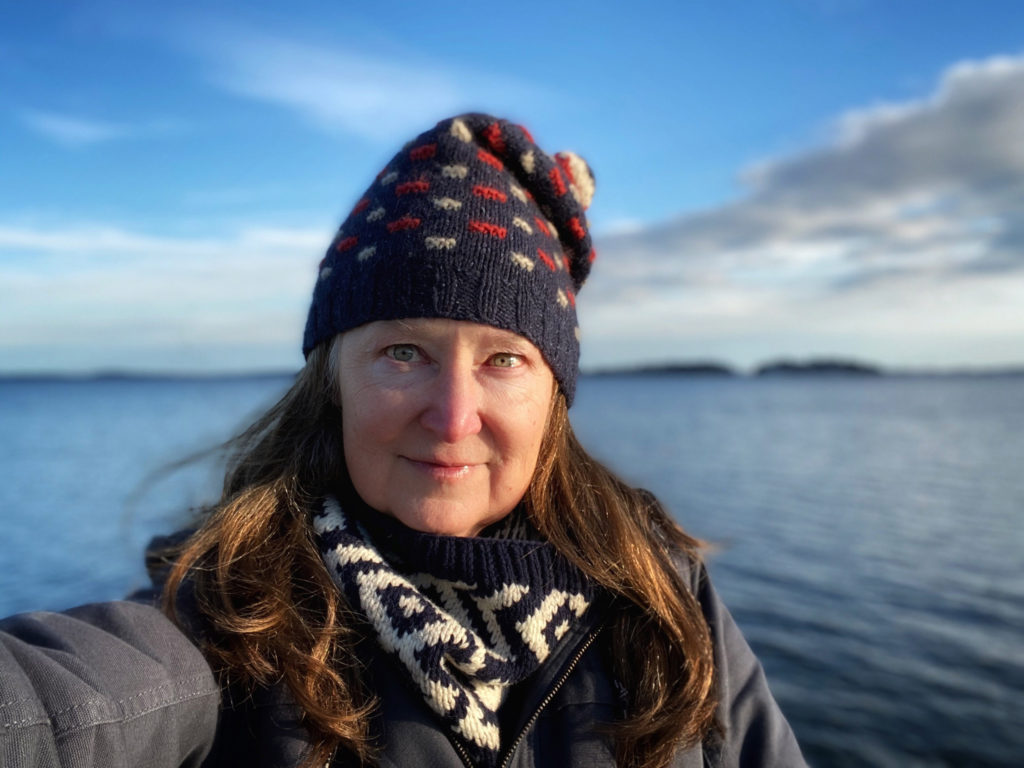
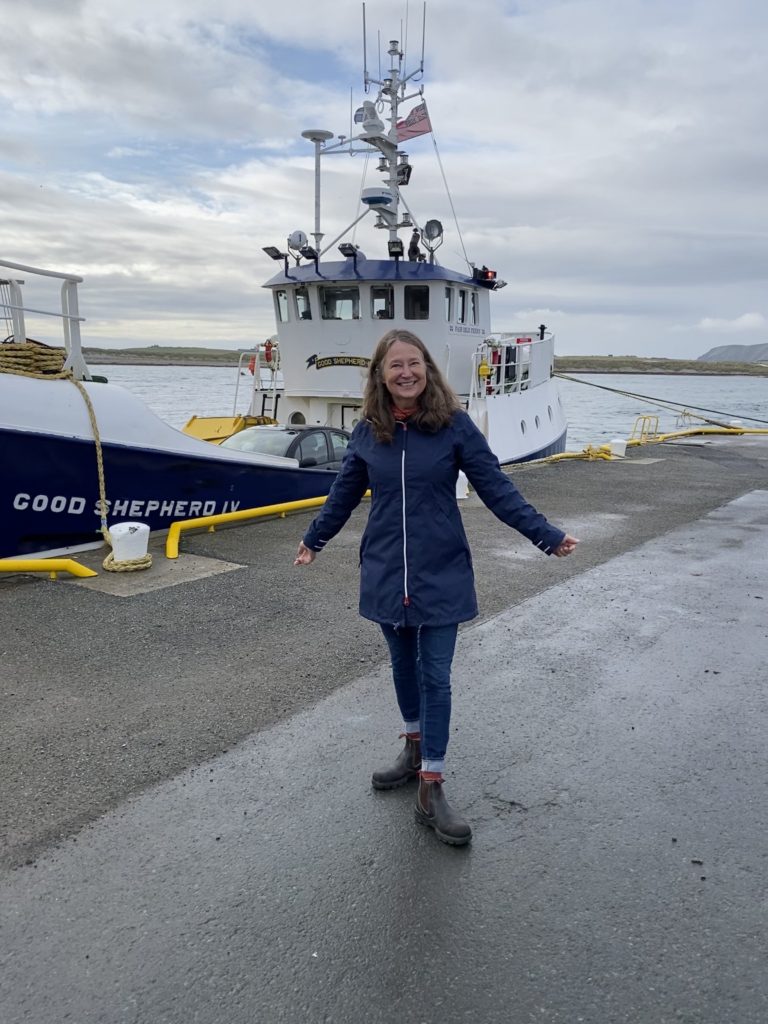
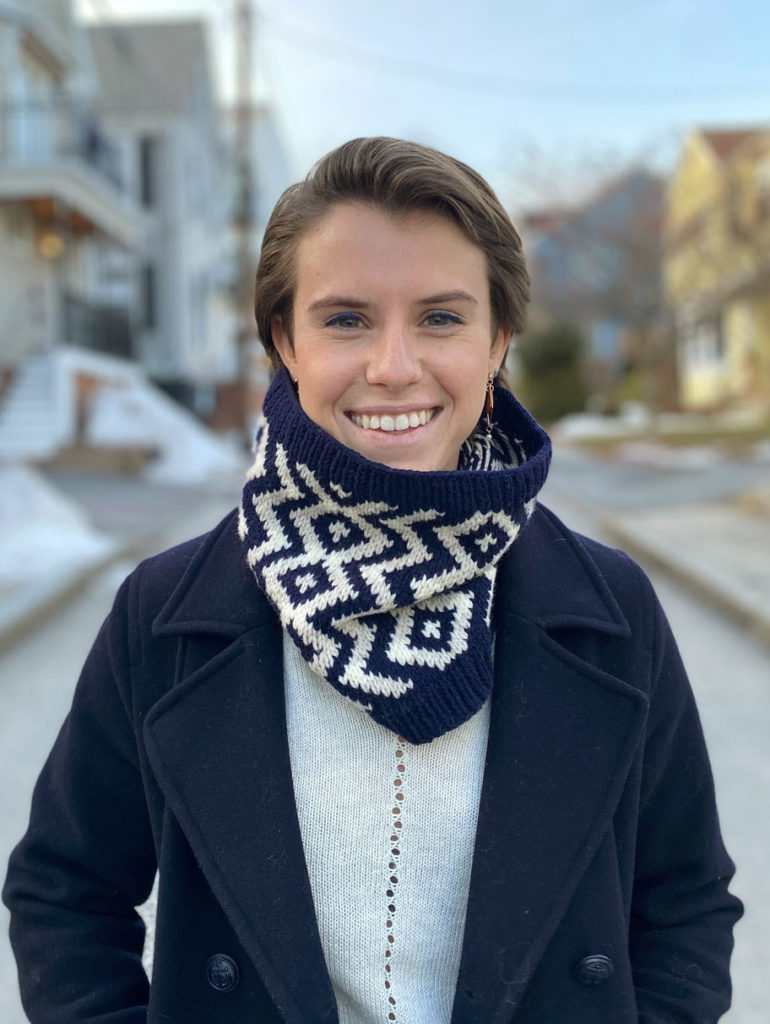
I’ve been wearing my version ever since! Here I’m at the end of the dock in Falmouth Maine, at the town landing.

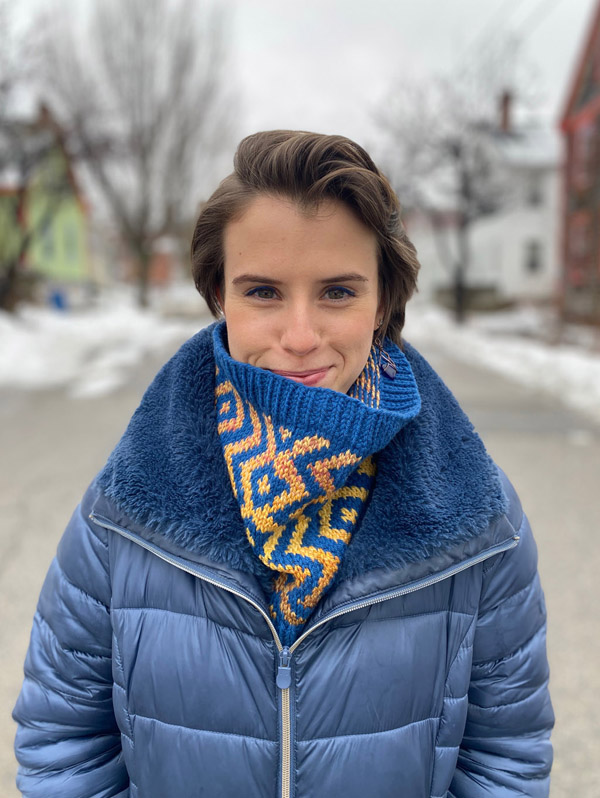
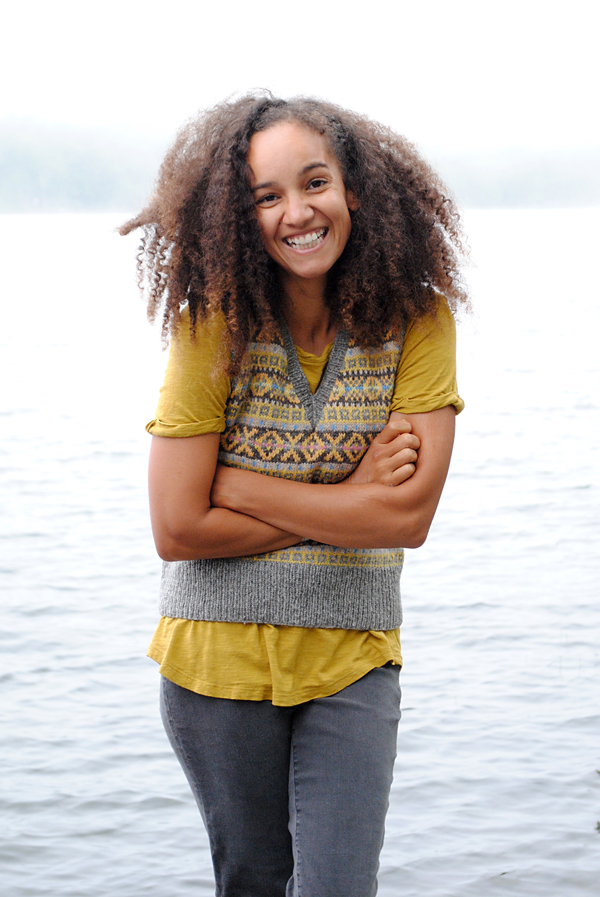
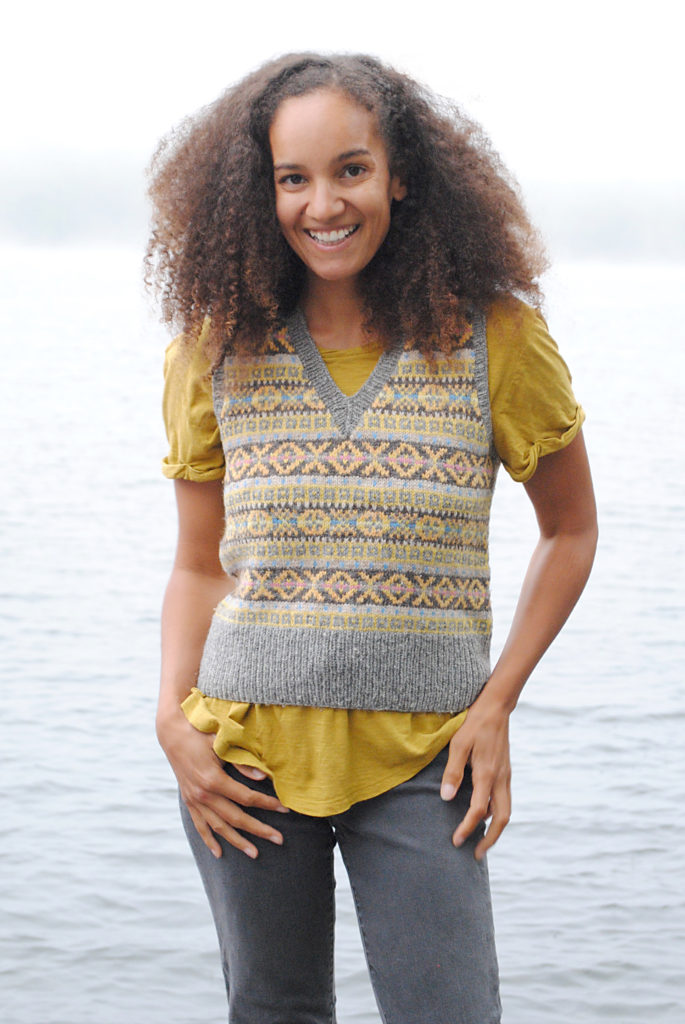
Olivia, my wonderful intern for the last few weeks, willingly took on making a second sample. She choose Lark in River, a medium blue color and a wonderful variegated yellow called Salty Dog, in Dream State, by Spincycle Yarns out of Bellingham, Washington.

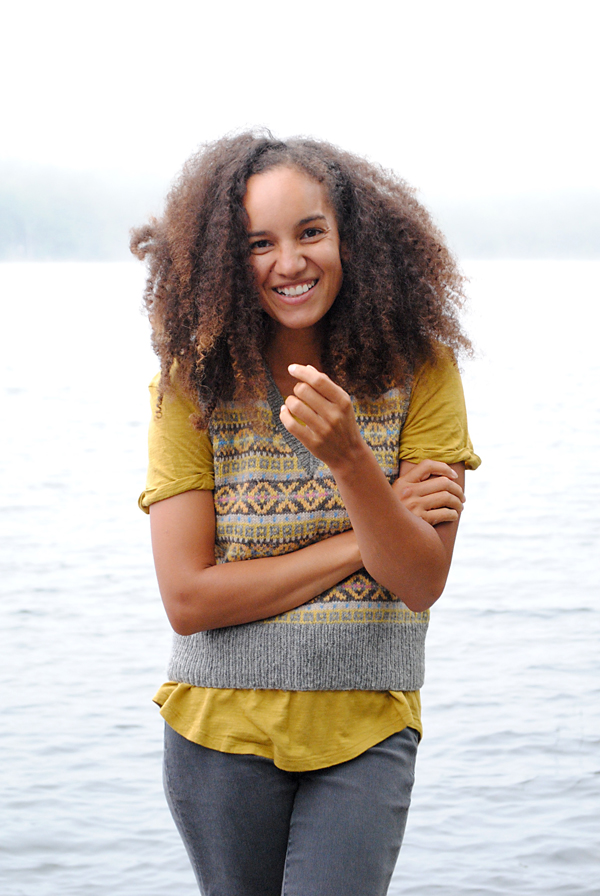
We were both delighted with the resulting cowl, the colorplay of the Spincycle yarn is effortlessly beautiful! Olivia herself is extra extra, agreeing with only a tiny hesitation to being my supermodel at the drop of a hat, twice!

I can not thank her enough, she’s the best!

Estimated Worsted Weight Yarn Amounts

  • Version 1 MC 165yd [150m],  CC1 60yd [55m],  CC2 30yd [28m]
  • Version 2 MC 165yd [150m],  CC  90yd [83m]

Cushing Cowl

20% off with code: 2020

through midnight

Sunday February 21, 2020

on Ravelry

My thanks to you!

Further Reading: Diagonal Knitting: A Different Slant, by Katharine Cobey


I LOVE seeing your MJM WIPs and FOs! Please tag me so I don’t miss them! @mjmucklestone #maryjanemucklestone

Filed Under: Knitting Tagged With: Classes, color, colorwork, colour, colourwork, cowl, design, handknitting, inspiration, knitting pattern, Maine, quick knit, quince&co, ravelry, spincycle yarn, stranded knitting, winter accessories, wool, yarn

Gift-A-Long 2019

November 26, 2019 by Mary Jane Leave a Comment

I’m offering 25% off twenty of my patterns beginning Tuesday Nov 26th at 8pm EST through end of day Monday Dec 2nd!

It’s the Ravelry Indie Designers Gift-A-Long and I’m participating for the first time.

Visit my Ravelry designer page and click on the Gift-A-Long bundle.

Indie Designer Gift-A-Long 2019 is a multi-designer promotion that should help jump-start your gift making whether for the holidays or anticipating the year ahead.

Beginning at 8pm EST today, it’s a 5 week long KAL & CAL of making gifts using patterns designed by a giant list of participating designers. Starting today, hundreds of patterns are on sale for gift knitting and crocheting. It’s a great way to explore new-to-you designers. When I took a look it made me want to pick up my hook and do some crochet.

For my sale bundle, I chose 20 projects that would be fairly quick to knit, some at a large gauge and others small but interesting projects.

In the spirit of the season and for the fun of the Gift-A-Long this is the only time I’ll be offering such a big discount on my patterns.

Filed Under: Events Tagged With: artisinal, color, colorwork, colour, craft, crochet, fair isle, fiber, fibre, Gift-A-Long, handmade, handmade craft, KAL, knit, knit-a-long, knitting, knitting pattern, Mary Jane Mucklestone, quick knit, sale, women apparel, wool, yarn

Vementry Vest

November 23, 2019 by Mary Jane 1 Comment

Vementry Fair Isle Vest

Vementry Vest has been published on Ravelry as a stand-alone pattern with extended sizes. It was originally designed for my Craftsy Class (now Bluprint) The Fair Isle Vest: Stranded and Steeked, and is in my opinion a great introductory project for Fair Isle knitting, not too hard, but with enough going on to learn the basics. The traditional styling makes the vest popular with experienced knitters as well. With unisex styling it is easy to customize and make your own. It’s a wonderful project for developing your own colorway. Find the pattern Here.

Vementry Vest is knit with a DK weight yarn so the work goes quickly. You can immediately see progress. It is knit in the round with steeks for the armholes and neckline. The pattern comes with two pdfs, one each for the smaller sizes and the larger sizes, so you only have to print the one you need!

Isle of Vementry, Shetland

Vementry Vest is named after Vementry, an uninhabited island in Shetland, that I was lucky to visit with friends several years ago. As there isn’t a bridge or a ferry, we chartered a boat in of the town of Aith on Mainland Shetland. The island is known for its well-preserved Neolithic heel-shaped cairn, which sits at the highest point on the isle with spectacular views in all directions.  Cairns were used as burial chambers, and heel shaped ones are only found in Shetland and Orkney.

PATTERN DETAILS Smaller Sizes

Finished Smaller Sizes 1 (2, 3, 4, 5, 6, 7, 8)
Bust 32 (34½, 37, 39½, 41¾, 44¼, 46¾, 49¼) in, 81.5 (87.5, 94, 100, 106, 112.5, 119, 125) cm

Yarn
Jamieson’s Double Knitting (100% Shetland wool, 25 gr ball – Approximately 82 yds / 75 m)
4 (4, 5, 5, 6, 6, 7, 7) skeins 103 Sholmit (MC)

2 (2, 2, 2, 3, 3, 3, 3) skeins 102 Shaela
1 (1, 1, 1, 2, 2, 2, 2) skein(s) 106 Mooskit
1 (1, 1, 2, 2, 2, 2, 2) skein(s) 105 Eesit
1 (2, 2, 2, 2, 2, 2, 2) skein(s) 182 Buttercup

2 (2, 2, 3, 3, 3, 3, 4) skeins 390 Daffodil
1 skein 350 Lemon
1 skein 660 Lagoon
1 skein 570 Sorbet

PATTERN DETAILS Larger Sizes

Finished Larger Sizes 9 (10, 11, 12, 13)
Bust 51 3/4 (54 1/4, 56 1/2, 59, 61 1/2) in, 131.5 (137.5, 144, 150, 156.5) cm

Yarn
Jamieson’s Double Knitting (100% Shetland wool, 25 gr ball – Approximately 82 yds / 75 m)

7 (8, 8, 9, 9) skeins 103 Sholmit (MC)
3 (3, 4, 4, 4) skeins
102 Shaela
2 skeins 106 Mooskit
2 skeins 105 Eesit
2 (3, 3, 3, 3) skeins 182 Buttercup
3 (4, 4, 4, 4) skeins 390 Daffodil
1 skein 350 Lemon
1 skein 660 Lagoon
1 skein 570 Sorbet

Find Vementry Vest on Ravelry

Filed Under: Patterns Tagged With: color, color pattern, colour, craft, DK weight, fair isle, fiber, fibre, handmade, handmade craft, Jamieson's, knit, knitting, knitting pattern, Mary Jane Mucklestone, ravelry, shetland, sizing, steek, steeking, unisex, updated sizes, Vementry Vest, Vest, wool, yarn

Fair Isle – the place

October 13, 2019 by Mary Jane 6 Comments

Three sheep rounded up during the caa on Fair Isle. Iconic Sheep Rock in the distance. Bright green grass with blue seas and sky.
Sheep with Sheep Rock in the distance, Fair Isle, Shetland.

When an opportunity arose to spend a week on Fair Isle in a creative residency, I jumped at the chance. To enjoy peace and reflection in the place where my favorite knitting technique hails from was a gift.

Lying where the North Sea meets the Atlantic Ocean, it takes a bit of planning to get to Fair Isle. Traveling from Maine, USA, I took a bus, three planes, a car and a boat! Even with the best of planning, you are never guaranteed of getting there, it all depends on the wind and the weather.

  • MJ and
    The Good Shepard IV
  • Farewell Mainland
  • Hello Fair Isle!

I’ve always wanted to take the boat to Fair Isle, but time constraints and unwilling companions meant I’ve always flown. I believe we had a good crossing, or maybe I’m just used to being on lobster boats, but I loved every moment of our journey. Watching Mainland Shetland recede, while Fair Isle slowly came in to focus made it all the more real for me, getting to an island by boat just seems right. I posted some videos on Instagram (@mjmucklestone) if you would like to see more.

And here below is my darling croft-for-the-week, where I spent time working on my upcoming book. Stay tuned for further posts, take a look at my instagram archives, and sign up for my Newsletter!


Lower Leogh Creative Residency with Malcolm’s Head in the background.

Fair Isle Travel information

By Air:

  • Air Task – Shetland Islands inter island air service
  • Air Task Facebook Page Keep an eye on this page for current flight information.

By Sea:

  • The Good Shepard IV  Tuesday year round, also Saturday in Summer, weather permitting.

Where to Stay:

  • Auld Haa Guesthouse
  • South Lighthouse Bed and Breakfast
  • Upper Leogh Guesthouse

Fair Isle Studio – Creative Residency

  • Fair Isle Studio Residency details and application information.

Filed Under: Travel Tagged With: Air Task, artisinal, Auld Haa Guesthouse, craft, fair isle, Fair Isle Studio, handmade, knit, kntting, Mary Jane Mucklestone, shetland, South Lighthouse Bed and Breakfast, The Good Shepard IV, Upper Leogh Guesthouse, yarn

Cast On Sólbein Steekalong!

January 1, 2019 by Mary Jane 3 Comments

Happy New Year!!! I thought I had it all planned out. But at the last moment I drove to Montreal to spend New Year’s Eve with my son in Montreal. I grabbed 3 balls of red Lettlopi from my stash. It’s really the only color I have enough of…I’m going to try and make it work.

When I went to sleep early this morning, I’d decided to start with the sleeve, totally forgetting that Solbein is knit top down. Not to be thwarted, I used a provisional cast on and went from there. I can graft the cuff on at the end with kitchener stitch – which I LOVE. So added pleasure. That’s if I end up liking how the colors work.

The reds are really really close in value…it might look cool like melted candle wax, or kind of a fade…or it might be too close in value. Honestly after the festivities of last evening my brain is a little muddled and I had a hard time following my own pattern especially on the 3 color round. I think I’ll draw a chart that has the reds in the right spot, so I don’t have to color-translate the chart. New term: color-translate!

I’m lucky to have a helper.

Travel over to Fringe Association to read what Karen has to say about the steekalong! We’re so happy that so many of you have joined us.

There will be prizes!!!

Use the tag #fringeandfriendssteekalong on Instagram so we can see what you’re up to!

Post any comments or questions you have here, or on Karen’s blog. I’ve also got a thread in my Ravelry group going. Bear with me, I usually forget to check everywhere…but NO FEARS MY FRIENDS!!! We’ve got you covered.

Off the top of my head I know we’ll be talking about those 3 color rounds and how to best handle 3 yarns (go slowly, slow and steady wins the race). Steeking methods, what to consider, and what happens if you change your mind 1/2 way through your project. To button band or to zipper…one of my big decisions…. We’re going to have fun!

Sólbein Cardigan

Just joining us now? It’s not too late! Find the pattern here.

The pattern includes a steeking tutorial that explains machine stitched steek reinforcement. I’ve also got a post on a crochet reinforced steek here.

Happy Happy New Year!!!

Filed Under: Events Tagged With: artisinal, color, color pattern, colorwork, colour, fair isle, fiber, fibre, handmade craft, knitting, Lettlopi, Mary Jane Mucklestone, ravelry, Solbein Cardigan, steek, Steekalong, steeking, top down, wool, yarn

Sólbein Steek Reinforcement

December 20, 2018 by Mary Jane 13 Comments

I designed Solbein Cardigan to be an ethereal light weight garment using a larger needle than is called for on the ball band. Lettlopi is an aran weight yarn and I used a needle size you’d more commonly use with a bulky weight yarn.

Sólbein is knit top down and in the round, with two purled steek stitches down the front which are later cut open to make it a cardigan. This is a pretty common way of making steek stitches in Iceland, often they only have a single purled stitch. The column of knit stitches on the reverse side make it easy to see where to run a line of sewing machine stitching to reinforce them. My Sólbein Cardigan pattern comes with an illustrated tutorial for the machine sewn process.

Now I know it isn’t always easy to carry a sewing machine around in your knitting bag, but a crochet hook fits just fine. Guess what? You can reinforce your steek stitches with slip stitch crochet! The thing is, it’s a little tricky with the purl-stitch steek to see what you’re doing. It may be wise to plan ahead if you know you don’t want to use a sewing machine and make a different kind of steek.

I made a couple of swatches, practicing for color and I decided to make some steek stitches in them so I could quickly show how to do a crocheted steek with the two purled stitches as the pattern is written, and another version with 3 stockinette stitches for the steek.

Purled Steek Stitches
A pink basting thread marks the center of the two purl-stitch steek.
The purled steek stitches are easy to see on the reverse side of the fabric where they appear as stockinette stitch.
In real life, you can see the steek stitches underneath the floats that obscure them. If you were using a sewing machine to reinforce the steeks you would work from this side. The sewing machine will nail down the floats and the steek stitches.

Plan ahead If you know you’d like to do crocheted reinforcement, you may want to make a 3 stitch or 5 stitch stockinette-stitch steek. You will want to alternate the colors used in the rows you are knitting. This will make it easier to work the crochet reinforcement because it is easy to see the individual stitches.

Sample stockinette stitch steek charts. The stitches of the three stitch steek will be cut down the center of stitch #2. The five stitch steek will be cut down the center of stitch #3.

Stockinette Stitch Steek with 3 Stitches
A pink basting thread picks out the center stitch of the steek. With crochet, you need to work from the right side of the work so the finished edge will magically fold to the inside once the button band is picked up.

Let’s get started!

First gather all your materials together. Make sure you are well rested and hydrated. Have an apple handy or a chocolate bar in case you get hungry.

You’ll need a pair of sharp scissors. A crochet hook slightly smaller in diameter than the Lettlopi. For the reinforcing yarn choose a color close to the body of your garment, just to make sure it won’t show through to the front. It should be a sticky yarn, not something like superwash. I used Jamieson & Smith 2 ply jumper weight. And for my demo I chose a color that would stand out not blend in so you can see it.

I also like to have a tapestry needle and a bright thread slightly longer than the length of the garment. I used it for basting down the center stitch as seen above, and where I will eventually cut. It also helps me when I’m picking up the stitches I’m going to crochet.

I’m going to show you the stockinette stitch steek first, because it is a lot easier to see.

Reinforcing Stockinette stitch steek with slip-stitch crochet

We work a line of slip stitch crochet as reinforcement. As you face the garment (or swatch) work from the bottom left side, moving to the left, up towards the neckline. When you get to the end of the steek, fasten off the yarn. Then rejoin new yarn and work down the right side of the steek.

Working the Slip-stitch crocheted reinforcement.

Left to right above: Working from bottom left, insert the hook in one leg one of the stitch adjacent to the center stitch and one leg of the center stitch. Pull reinforcing yarn through. Insert the hook through the next legs to the left of the ones just worked. Bottom row left to right: Pull the reinforcing yarn through new legs and the loop of the reinforcing yarn. Continue in this manner until you reach the end of the steek.

One side of steek reinforced with slip stitch crochet

Left: Working second side of steek. Right: Both sides of steek reinforced.

Pull apart the reinforced stitches to reveal the bars between them which we will cut.

It is so pretty and tidy!

The act of picking up for the button band will further secure the floats.

I didn’t add button bands, maybe next week!

Crochet reinforcement for purl-stitch steek stitches

Now! Reinforcing the purl-stitch-steek with slip-stitch crochet. It is a bit hard to see the stitches you need to pick up. Just go slowly and analyze as you go, peeking to the inside if it helps. We will be crocheting one leg of the center purl stitch and the closest leg of the adjacent body stitch. This means we will be infringing on the body of the sweater, but it is only going to reduce the circumference of the sweater by one or two stitches depending on where you pick up for the button band.

The process is the same as the stockinette stitch steek, only it’s a lot harder to figure out which leg of the purl stitch you need to catch, but as I said, go slowly. And when you’re finished, celebrate!

It makes a pretty edge on the right side. On the wrong side the floats are floating free. They can be caught when you pick up for the button band as you can see below. Also remember, Lettlopi is sticky, so it is unlikely to unravel.

OK folks! That’s it for now! Hope to see you in January for the Fringe and Friends Steekalong! Tag your pictures #fringeandfriendssteekalong #sólbeincardigan #maryjanemucklestone so we can all find them and see them!

Fringe and Friends Knitalong 2019: Get ready to steekalong!
Sólbein palette ideas and a GIVEAWAY
Steekalong prep: Mary Jane on choosing yarn
Steekalong prep: More than one way to knit a steek

Sólbein Cardigan Images by Carrie Bostick Hoge. All other images are mine. Solbein Cardigan pattern can be found on Ravelry and also in Making Magazine No.4 Lines.

Many thanks to Emily Qualey for making the gif magic !

    Filed Under: Events, Patterns Tagged With: apparel, artisinal, color, colorwork, colour, craft, crochet, fair isle, handmade, icelandic, knit, lopi, Maine, Mary Jane Mucklestone, steek, steeking, stranded knitting, tutorial, wool, yarn

    Next Page »

    Before Footer

    Footer

    • Facebook
    • Instagram
    • Pinterest
    • Twitter
    • YouTube

    Mary Jane Mucklestone © 2020