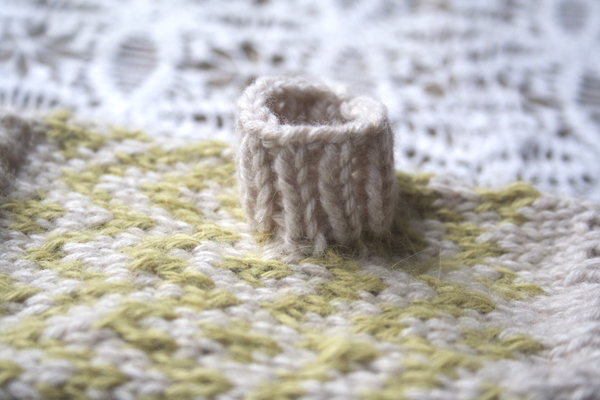
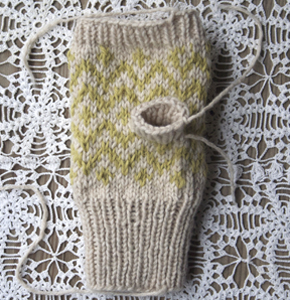
Ah the beautiful Afterthought Thumb on my Muckle Mitts! Technically this isn’t an afterthought, since we did think about it by knitting waste yarn into the spot where we’ll make the thumb later, See my last post “Waste Yarn, What Yarn?”. When I learned this thumb, I found picking up the stitches around the waste yarn confusing.
So let’s go through it step by step.
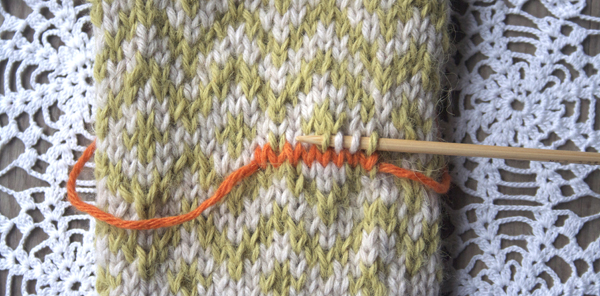
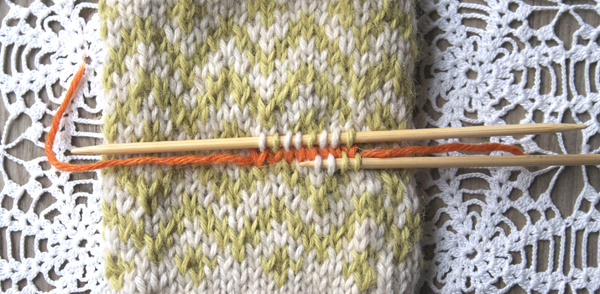
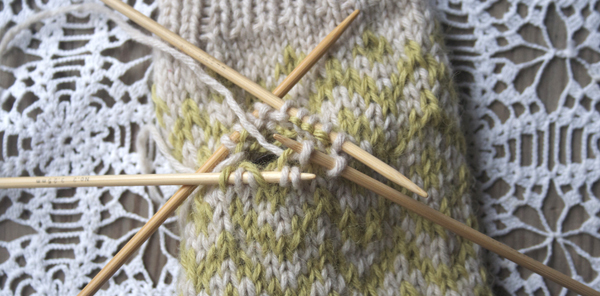
[Above] Here we see the 8 stitches of waste yarn knit in between Rnd 11 and Rnd 12 of the chart.
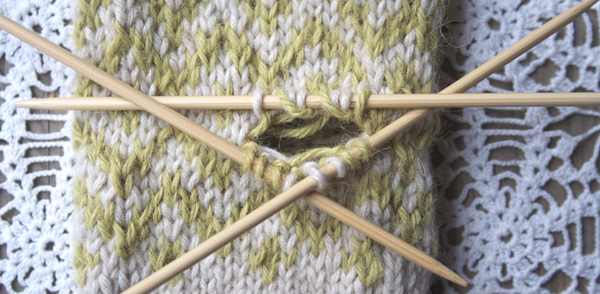
Using one of my smaller needles I’ve picked up four stitches above the waste yarn, picking up the Right Hand leg of each stitch. Picking up the Right Hand leg of the stitch will mount the stitch correctly on the needle, handy when we get around to knitting it.
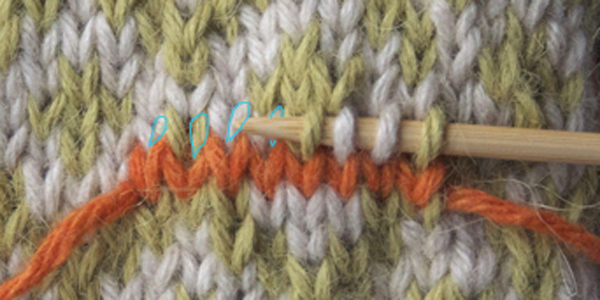
[Above] Here’s a close up, see the outlines of the Right Hand leg of the stitch…now of course the point of the needle is obscuring the next stitch that we need to pick up…the difficult thing about still photos..but the turquoise outlines indicate the Right Hand leg of the stitches we will pick up.
Note: It is not the end of the world if you don’t get the correct leg of the stitch, you’ll be able to compensate when you knit it later. The worst thing that can happen is that the stitch will be twisted, which won’t really matter in the great scheme of life.
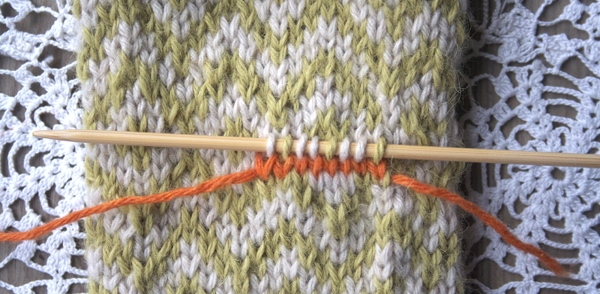
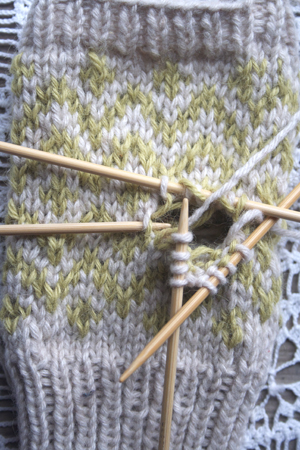
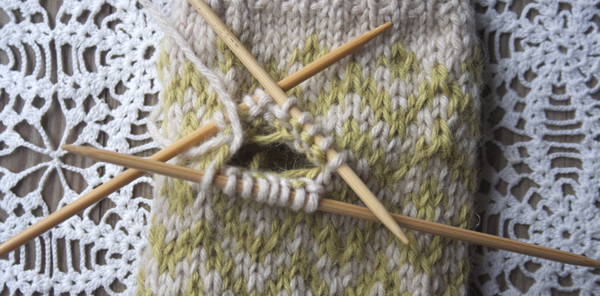
[Above] Now I’ve got all 8 stitches positioned on the needle.
[Above] I’ll leave that needle in place and pick up 8 stitches from below the waste yarn. Again, I’m picking up the Right Hand leg of each stitch, so they will all be positioned correctly for knitting. I’ve got 3 stitches on the needle and I’m just picking up the 4th stitch with the tip of the needle.
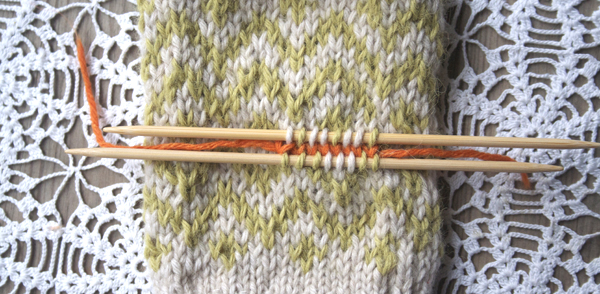
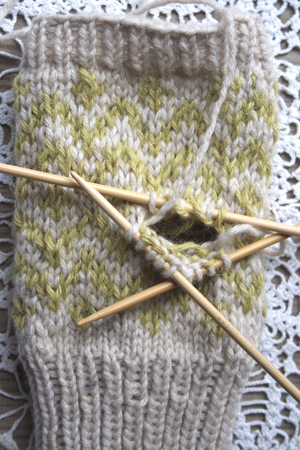
[Above] Ok – 8 stitches each on both needles. Next we”ll remove the waste yarn
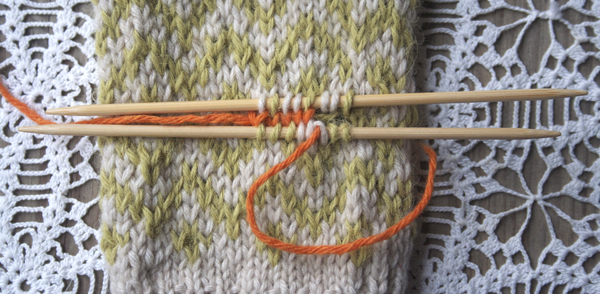
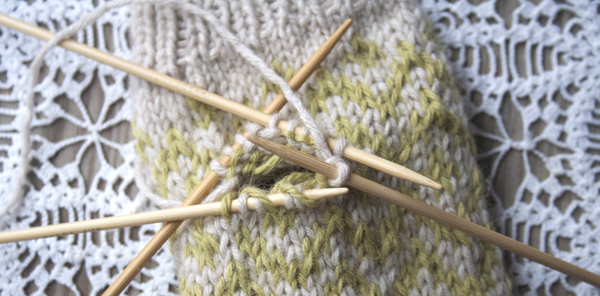
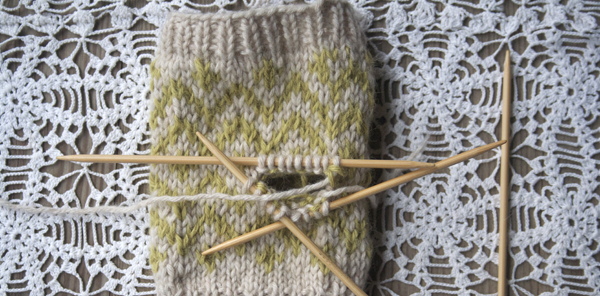
[Above] To remove the waste yarn un-pick the orange stitches….sort of slide the orange yarn out. I use another needle to kind of yank it gently out. Like chimpanzees use a stick to get ants from an anthill…a little like that anyway

[Above] Here we go, the waste yarn is all the way out, leaving a gaping hole, but hello, all the stitches are safe and secure…even those wonky looking chartreuse ones. As frightening as they look they are fine, we’ll deal with them later.
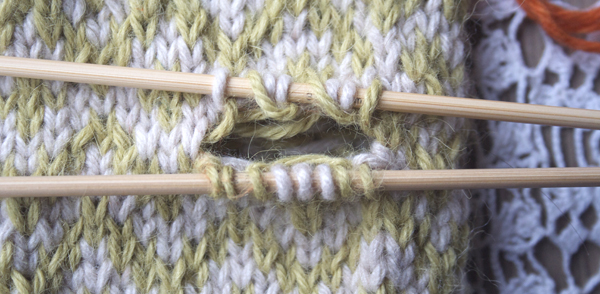
[Above] Here are those scary stitches up close. The reason the chartreuse ones look so weird, is because the yarn we see at this point is both the stitch and the float. Don’t think about it too much or your head will ache, just trust me – when we knit them everything will be perfect.
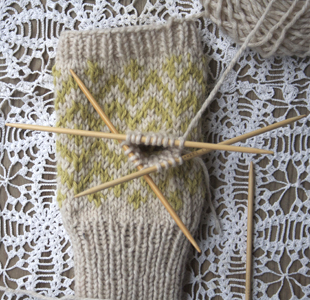
[Above] Now we need to put the lower stitches on two needles so we can begin knitting. We’ll name our needles: Needle #1 Lower Right, Needle #2 Lower Left, Needle #3 Up Top. Time to knit!
[Above Left] Using my Main Color yarn, in this case Natural White, I’ve knit across Needle #1 and just finished knitting across Needle #2.
Needle #2 is in such a crazy perpendicular arrangement to facilitate the next step…
At the corner here, between Needle #2 and Needle #3 we’ll pick up a stitch. Insert the tip of your working needle under a stitch or two of the body of the mitt, in the corner between Needle #2 and Needle #3 – knit a stitch onto Needle #2. Sometimes I find it easier to use a spare needle as shown, to knit this “picked up stitch, and then place the stitch back on needle #2.
[Above Right] We now have 5 stitches on Needle #2.
[Above] Time to knit Needle #3. We’ve turned the work, Needle #3 is on the bottom of the picture now. I’ve knit the first stitch..but…Horrors! The next stitch to knit looks so messy!
[Above] Not to fear, just knit that wonky Contrast Color stitch. See the new stitch on the Right Hand Needle? It’s fine and dandy.
[Above] I’ve knit all the way across Needle #3. See? Not wonky. Pretty pretty!

[Above] Now, pick up the corner stitch between Needle#3 and Needle #1, just like you did before. If you’re using an auxiliary needle, make sure the stitch goes back onto needle #3.
We have 4 stitches on Needle #1, 5 stitches on Needle #2 and 9 stitches on Needle #3 for a total of 18 stitches.
[Above] Okey Dokey! I’ve knit all the way around the thumb opening once. We’re looking at our thumb right side up again, with Needle #3 at the top.
[ Above Left] Now it is time to begin ribbing. We’ll work a K1 P1 rib for 5 rounds and then cast off in the rib pattern.
[ Above Right] Done – Ta da!
That wasn’t so hard now was it? Just knit it is my suggestion, don’t think about it too much before hand and you’ll be fine. Too much thinking and worrying is paralyzing and damn it – your hands are getting cold!
Want a tutorial for eliminating holes in the corners of your afterthought thumb? Read:
Thank you, Mary Jane, for this wonderful tutorial. It really gives a clear lesson on how to do the after-thought thumb. Now I have a reference for when I get to that part of the pattern.
Thank you so much. This is so helpful for this pattern and every other mitten and glove pattern!
Thank you for this tutorial, very helpful for knitting your mitts, and quite funny too 🙂 I manage to knit this with magic loop instead of dpn, without big troubles. And I’m happy for that! 🙂
Hello,
I spend way too many hours reading yours and others websites 🙂
At present I am struggling with trying to work out how to knit the sleeves on Tiny Tea Leaves 🙁
After reading your explanation of ‘thumb’ on Mucklestone Mitts, I feel confident to tackle this pattern.
Your explanatory notes are so clear and concise.
I really am hoping to try coloured knitting, fair isle.
I remember my mum spinning then knitting me a fair isle jumper when I was 12.
Using naturally coloured fleeces, a very treasured memory.
Thank you
Caroline
It is currently 41 degrees, here in South Australia, and I do find I loose my knitting mojo a little in the heat.
MJM: Thanks so much for this great tutorial! I just made a pair of Mary Ann Stephens’s Zinnia mittens for a friend, and both times the thumbs (also afterthought in fair isle) reduced me to gibbering rage and frustration and then an emergency trip to a knitting friend/expert’s house for help–and I’m a pretty accomplished knitter. I realized the “wonky stitches” were what tripped me up, and I am hoping that a session with a pair of Muckle Mitts (which are wonderful anyway but not quite the two month commitment of the Zinnia pattern) will get me clear on exactly how to go about this whole afterthought process. THANK YOU!
This is fantastic, really, really helpful. Sadly I didn’t come across it in time for the first two pairs, which I had to fudge a bit, but they seem fine, but I will certainly use this for the next two pairs – two more daughters waiting impatiently for their Muckle mitts.
Thanks so much for this tutorial. I am making colorway mittens and those “wonky stitches” were really worrying me. Looking forward to continuing my pattern.
Hope to make you fingerless mitts someday! Thanks for that pattern!
I really love that first photograph. The thumb looks so architectural.
I am knitting mittens. I have come to the part where you knit the thumb. My problem is that when I go to knit the thumb,the stitches look like I am knitting on the wrong side. It doesn’t matter if I turn it inside out either. I tried to purl them but it gets to tight and very difficult to knit . Please help…
Troubled…..
Oh Linda, I only saw this today! I trust everything has turned out OK with your mittens. It is so hard to answer without seeing exactly what you are doing…if you are picking up your stitches with the outside of the mitten facing you, and then knit on the outside of the hole, with the working needles closest to your body, you should be producing knit stitches….however, if you are knitting from the inside, with the needles farthest from your body, you might be producing purl stitches on the outside of the work….
Thank you for this fantastic tutorial on the peasant thumb! Would this work as a pocket on a cardigan with a three needle bind off to seal the pocket? I have a copy of EZ’s Knitting Without Tears and I don’t think I would be brave enough to cut †he stitches in a cardigan to make the pockets…
You know, I think it might! I really don’t see why not! Brilliant. Let me know how you get on you clever woman!
Hi Mary Jane,
I was flipping through my huge copy of the Principles of Knitting and sure enough, there is a description of a placeholder pocket that is like the peasant thumb.
Another question since it is related to stranding/colour work:
I do stranded knitting with a yarn in each hand and my left yarn is dominant on the RS when I knit in the round. For my Cowichan sweater, I need to knit flat and I am wondering which yarn will be dominant on the WS.
Thanks,
Christine
This is equal parts amazing and slap-forehead-why-didn’t-I-think-of-this. Thank you so much! I am going to use it the next time I knit anything for hands!
I love love love your tutorial. Especially the chimpanzee reference! lol I’ve never done an afterthought thumb, but I’m sure I will be able to do it now.
Thanks for finally writing about > All Thumbs – MaryJaneMucklestone < Loved it!
BEST tutorial on the Norwegian thumb I have EVER seen! Thanks!
Wonderful site you’ve right here
Question re: yarn weights. How many stitches should be allowed for the thumb with worsted weight yarn and size 8 needles. Is there a “formula” for different yarn weights/needles sizes?
THANK YOU for your expertise!
This is awesome! Thank you so much!
Thank you so much for posting this! I was at a total loss as to how I was supposed to make the thumb… This was so clear, great photos and explanation. Thank you again!
Love your tutorial it certainly demystified the how to!!!