• Skip to primary navigation
  • Skip to main content
  • Skip to footer
  • Home
  • Patterns
  • Books
  • About
  • Blog
  • Newsletter
  • Classes

Mary Jane Mucklestone

Hand Knitting Blog & Knitting Patterns

Knitting

Heart Cookie Mitts

February 6, 2012 by Mary Jane 28 Comments

Free For Three! Call me crazy but I’ve got an I Love You giveaway for 3 days only!

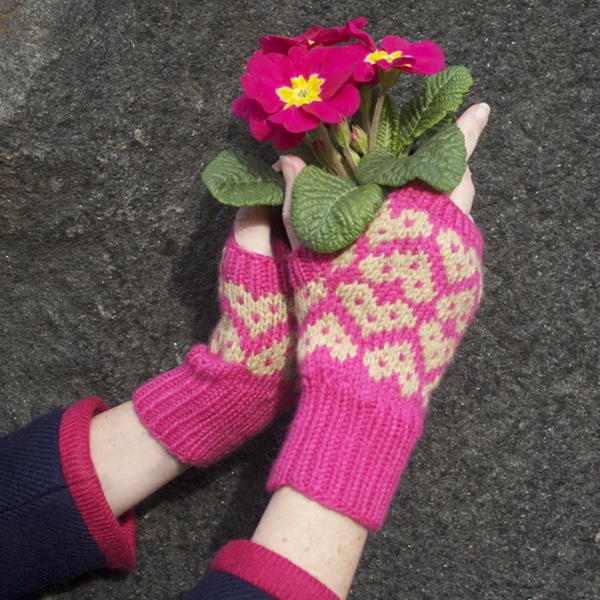
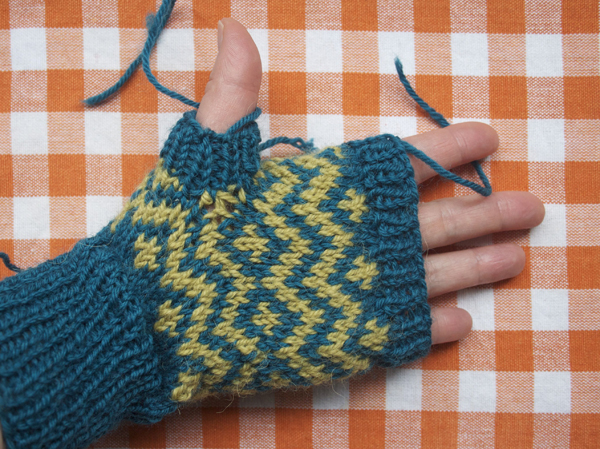
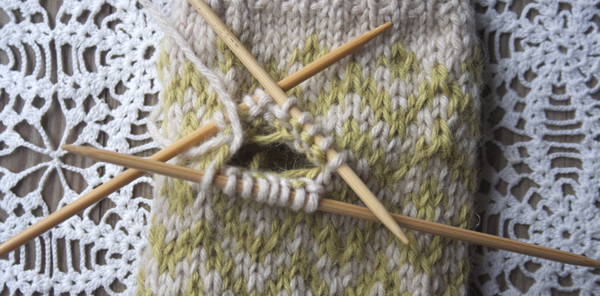
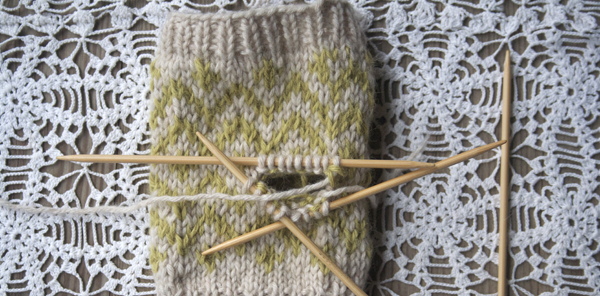
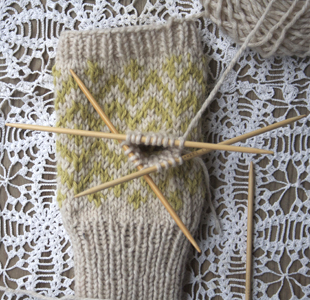
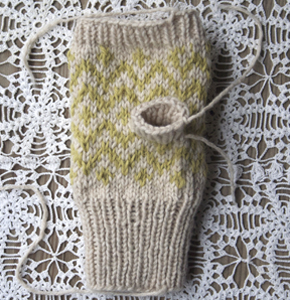
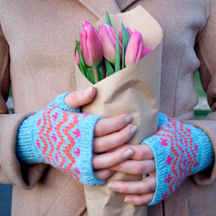
I was hungry and needed a sweetie. I wanted sugar sprinkled heart-shaped Valentine’s cookies. When none were to be found I whipped up these little cookie hearted mitts. They kept my mind off the real thing. Best thing? The next day I attended The Nordic Museum’s Knit Cafe, held the first Sunday of every month. Here, besides sensational knitters of all stripes you’ll find delicious coffee and delectable treats, including … sugar-sprinkled heart-shaped Valentine’s cookies!!!

Knit Cafe’s knitters are a welcoming group of all skill levels, from absolute beginners to world renowned experts like friendly Evelyn A. Clark, lace knitter of the highest order. I know, Evelyn A.Clark…be still my heart..and as you would imagine, she is kind and generous. This group is an intrepid lot too, having gone on many knitterly travels, including Iceland many times over!!!! The heart continues to beat wildly! ( Have you heard about Gudrun and I? That is another post…soon! ) Knit Cafe knitters are a game bunch of knitters, agreeable to becoming hand models at the drop of a hat! In chilly windy weather, balancing atop wiggly chairs. Not only that…Mary, for that is the owner of the lovely hands pictured, Mary is a conceptual stylist who came up with the powerful image below! Hail Mary!

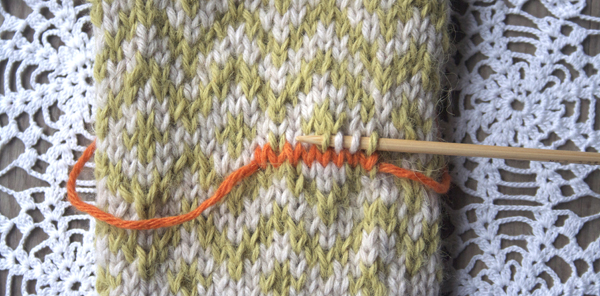
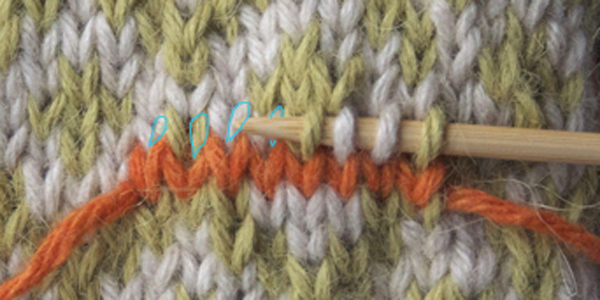
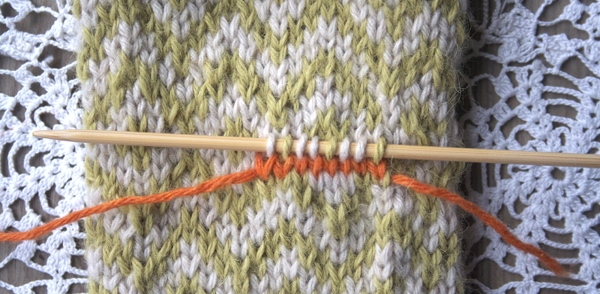
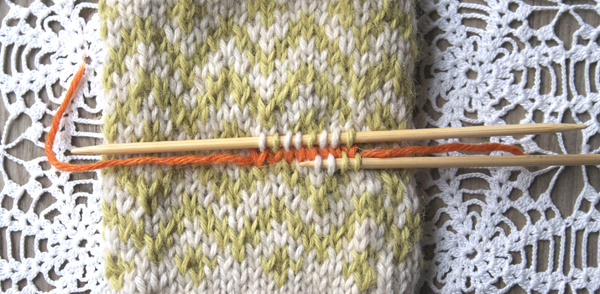
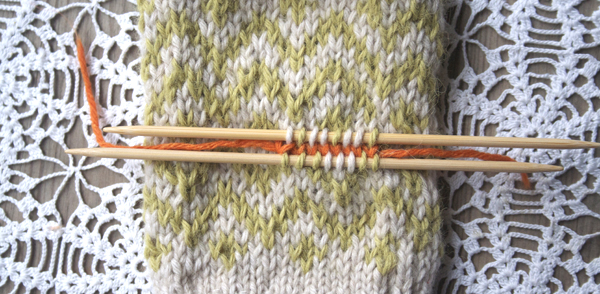
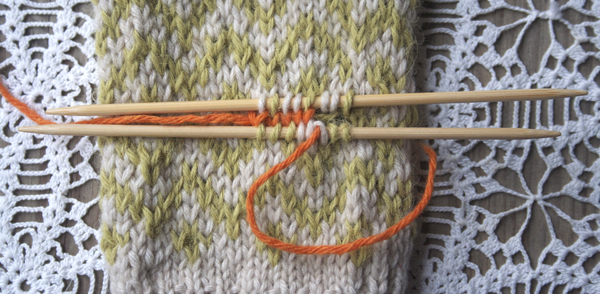
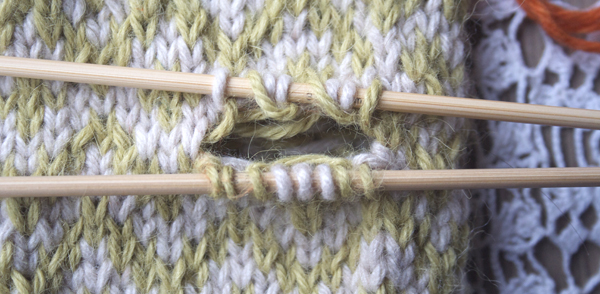
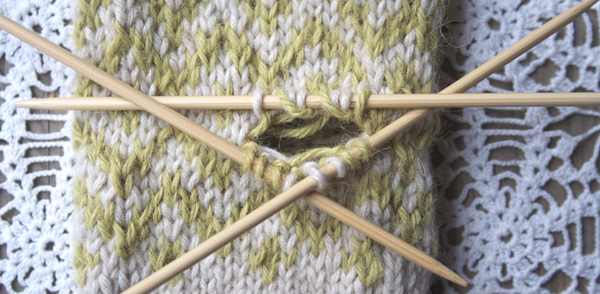
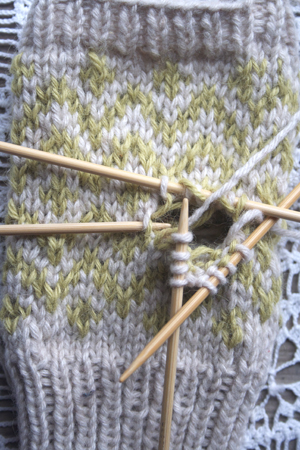
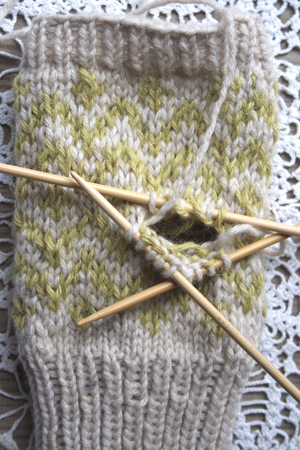
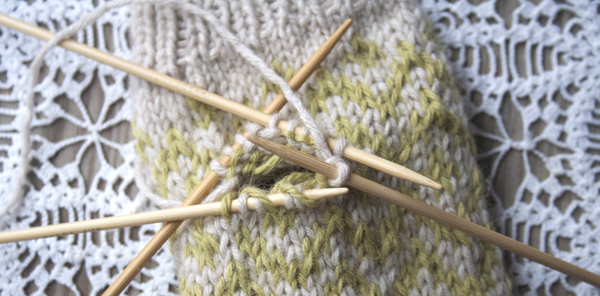
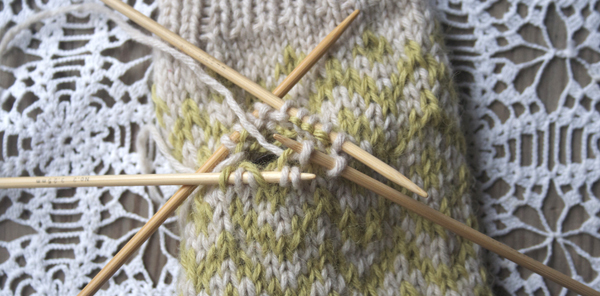
So as a thank-you to all my readers, because I love you, get My Heart Cookie Mitts pattern here, based on motif #147 in my book 200 Fair Isle Motifs: A Knitter’s Directory.

Filed Under: Knitting

Next Week Slater Mill!

February 2, 2012 by Mary Jane Leave a Comment

Slater Mill in Pawtucket Rhode Island is one of my favorite places to teach. There is such history there and the folks that run the event are the nicest in the world. On Friday night is a reception and a book signing with Deborah Newton, consummate pro and author of the unequaled tome Designing Knitwear. She’ll be signing copies of her book Finishing School . Finishing, the most important part of knitting, made fun! Yes indeed my dears. From 5-9 Cash Wine bar, not to be missed!

Saturday I’ll be teaching Andean Intarsia which I learned myself from patient Andean villagers. Mind bending and delightful! You will not believe what you will learn. I’ll bring along some fantastic examples from my Chullo collection for you to marvel over.

Sunday what better way to spend the day than knitting Fair Isle socks? Easy or complex you can choose, we’ll cover the basics and explore beyond the basics. Color, pattern and technique, there is always something new to learn.

February 10-12, 2012
Slater Mill 4th Annual Knitting Weekend
67 Roosevelt Avenue. Pawtucket, RI 02860
slatermill.org

Filed Under: Knitting

Holes! Horrors!!!

January 18, 2012 by Mary Jane 15 Comments

Ah yes you say, “I made your Muckle Mitts and I love them, but I have holes at the corners of the thumb, what did I do wrong?”

Nothing…as Isolda, who has been knitting for over 40 years, since she was a tiny girl in Germany said “There are always holes. We always have holes, even in school we had holes. There are just holes there. We know that.  We sewed them up, we still sew them up”.

And that is usually true…the holes are just…there. And yes, you take the tails of your yarn and sew them up.

Above First snug up the yarn from the outside, around the hole. You know, follow the stitches along and snug things up with the tip of a tapestry needle.

Above Then turn inside out and using the existing ends if they are long enough, begin to sew. These ends are, typically for me,  short. You should try and leave longer tails to give your something to work with. If you can’t work with too tiny tails, use a strand of your Main Color yarn about 8-12 inches long.

Above Now begin stitching carefully around the hole, taking little stitches skimming through the back side of the stitches. You don’t need to poke through to the front like a quilter would.

Above Take small stitches circling the hole, and gently snug things up.

Above Do it with both yarns, then weave in the ends as usual.

Above Like so.

Above Ta Da! No Holes. Now these babies need some serious blocking. Look at that bloated ribbing. Heavens! I’ll wash them lukewarm water with a mild soap, rinse in water of the same temperature,  gently press the moisture  out, shape my mitts into right and left hand, then dry flat.

Tutorials in the Afterthought Thumb Series:

Waste Yarn, What Yarn?

All Thumbs

Filed Under: Knitting Tagged With: afterthought thumb, mittens

All Thumbs

January 16, 2012 by Mary Jane 25 Comments

Ah the beautiful Afterthought Thumb on my Muckle Mitts! Technically this isn’t an afterthought, since we did think about it by knitting waste yarn into the spot where we’ll make the thumb later, See my  last post “Waste Yarn, What Yarn?”. When I learned this thumb, I found picking up the stitches around the waste yarn confusing.

So let’s go through it step by step.

[Above] Here we see the 8 stitches of waste yarn knit in between Rnd 11 and Rnd 12 of the chart.

Using one of  my smaller needles I’ve picked up four stitches  above the waste yarn, picking up the Right Hand leg of each  stitch. Picking up the Right Hand leg of the stitch will mount the stitch correctly on the needle, handy when we get around to knitting it.

[Above] Here’s a close up, see the outlines of the Right Hand leg of the stitch…now of course the point of the needle is obscuring the next stitch that we need to pick up…the difficult thing about still photos..but the turquoise outlines indicate the Right Hand leg of the stitches we will pick up.

Note: It is not the end of the world if you don’t get the correct leg of the stitch, you’ll be able to compensate when you knit it later. The worst thing that can happen is that the stitch will be twisted, which won’t really matter in the great scheme of life.

[Above] Now  I’ve got all 8 stitches positioned on the needle.

Picking up stitches below waste yarn on afterthought thumb

[Above] I’ll leave that needle in place and pick up 8 stitches from below the waste yarn. Again, I’m picking up the Right Hand leg of each stitch, so they will all be positioned correctly for knitting. I’ve got 3 stitches on the needle and I’m just picking up the 4th stitch with the tip of the needle.

Afterthought Thumb with all stitches picked up

[Above] Ok – 8 stitches each on both needles. Next we”ll remove the waste yarn

Afterthought thumb removing waste yarn

[Above] To remove the waste yarn un-pick the orange stitches….sort of slide the orange yarn out. I use another needle to kind of yank it gently out. Like chimpanzees use a stick to get ants from an anthill…a little like that anyway

Afterthought thumb with waste yarn removed

[Above] Here we go, the waste yarn is all the way out, leaving a gaping hole, but hello, all the stitches are safe and secure…even those wonky looking chartreuse ones. As frightening as they look they are fine, we’ll deal with them later.

stitches on needle with waste yarn removed closeup

[Above] Here are those scary stitches up close. The reason the chartreuse ones look so weird, is because the yarn we see at this point is both the stitch and the float. Don’t think about it too much or your head will ache, just trust me – when we knit them everything will be perfect.

[Above] Now we need to put the lower stitches on two needles so we can begin knitting. We’ll name our needles: Needle #1 Lower Right, Needle #2 Lower Left, Needle #3 Up Top. Time to knit!

[Above Left] Using my Main Color yarn, in this case Natural White, I’ve knit across Needle #1 and just finished knitting across Needle #2.

Needle #2 is in such a crazy perpendicular arrangement to facilitate the next step…

At the corner here, between Needle #2 and Needle #3  we’ll pick up a stitch. Insert the tip of your working needle under a stitch or two of the body of the mitt, in the corner between Needle #2 and Needle #3 – knit a stitch onto Needle #2. Sometimes I find it easier to use a spare needle  as shown, to knit this “picked up stitch, and then place the stitch back on needle #2.

[Above Right] We now have 5 stitches on Needle #2.

Afterthought thumb picking knitting first round

[Above] Time to knit Needle #3. We’ve turned the work,  Needle #3 is on the bottom of the picture now. I’ve knit the first stitch..but…Horrors! The next stitch to knit looks so messy!

picking up wonky looking stitches on afterthought thumb

[Above] Not to fear,  just knit that wonky Contrast Color stitch. See the new stitch on the Right Hand Needle? It’s fine and dandy.

[Above] I’ve knit all the way across Needle #3. See? Not wonky. Pretty pretty!

[Above] Now, pick up the corner stitch between Needle#3 and Needle #1,  just like you did before. If you’re using an auxiliary needle, make sure the stitch goes back onto needle #3.

We have 4 stitches on Needle #1, 5 stitches on Needle #2 and 9 stitches on Needle #3 for a total of 18 stitches.

afterthought thumb first round completed

[Above] Okey Dokey! I’ve knit all the way around the thumb opening once. We’re looking at our thumb right side up again, with Needle #3 at the top.

  • Beginning ribbing of afterthought thumb
  • afterthought thumb finished

[ Above Left] Now it is time to begin ribbing. We’ll work a K1 P1 rib for 5 rounds and then cast off in the rib pattern.

[ Above Right] Done – Ta da!

That wasn’t so hard now was it? Just knit it is my suggestion, don’t think about it too much before hand and you’ll be fine. Too much thinking and worrying is paralyzing and damn it – your hands are getting cold!

Muckle Mitts

Want a tutorial for eliminating holes in the corners of your afterthought thumb? Read:

Holes! Horrors!!!

Filed Under: Knitting Tagged With: afterthought thumb, knitting, technique

Waste Yarn, What Yarn?

January 15, 2012 by Mary Jane 14 Comments

My Muckle Mitts pattern features an “afterthought” thumb, the kind of thumb often employed in folk knitting. The beauty of it, is you can keep on knitting in your colorwork pattern with hardly any interruption. Just work a few stitches on waste yarn, slip them back to the left hand needle and continue on your merry way.

When you’re finished with the mitt, you pick up those stitches above and below the waste yarn and knit the thumb.

So lets lake it step by step, by knitting the stitches which will later become the base of the thumb, onto our waste yarn.

1. We knit our mitt through round 11 on the chart. When the round is complete, take your waste yarn and get it into position.

2. Then before we begin round 12, we knit the first 8 stitches onto the waste yarn like so.

3. Ok now just slip those 8 stitches of waste yarn back onto the left hand needle.

4. Now you knit round 12 – right into the waste yarn – and continue knitting the rest of the mitt.

Easy Peasy Pudding and Pie!

Stay tuned…tomorrow we’ll pick up stitches and knit the thumb.

Here’s the thumb link dearies:

All Thumbs

And the solution for those frightening holes:

Holes! Horrors!!!

Filed Under: Knitting

Whistlestop! Novel Knits Blog Tour

January 9, 2012 by Mary Jane 4 Comments

Hey everyone, please let me introduce the wonderful and talented Ann Kingstone, author of the newly released Novel Knits.  Make yourself at home and join in our conversation!

Hi Ann,
I’m so happy to be a part of your blog tour! I think I first “met” you when we both had designs included in The Joy of Socks. Stranded naturally!! Your “Snowbunny” socks are sensational and incidentally perfect for Valentine’s day!
I finally had the pleasure of meeting you in Scotland in 2010. A meeting I will never forget – you were the cutest most stylish woman there! All modern-scandinavian. Plus, you designed a fabulous vest just for the occasion, A Great British Knit. I instantly wanted to be you!

Haha!! Interestingly, when we met I instantly wanted to be you! So sparkly and vivacious…

You always refer to yourself as a Yorkshire Lass which to me is the most romantic thing. In fact, the old music hall tune describes you to a T

“Her eyes are like the little stars that shine so bright above,
Her cheeks are like the red rose bush, with her I fell in love;
Her pearly teeth and golden hair, a lass I wouldn’t pass,
The pride of all the country is me bonny Yorkshire lass.”

Blushing furiously now…

Yorkshire seems like a very big place, rich in history, with exotic sounding locations, to an American anyway, like East Riding of Yorkshire, and of course…the hallowed knitting lands of The Yorkshire Dales.
So tell me about your childhood, and where you grew up.

Yorkshire is indeed a very big place; the biggest county in England! The ‘Ridings’ are the old geographical sub-divisions, of which there were three – North, West, and East ridings. Alas, in the 1970s the government saw fit to strip away our historical identities (the Ridings date back to the Vikings!), and carved Yorkshire up into rather different administrative areas, dispensing altogether with the ancient name ‘Riding’. Some of us are rather sore about this! ;o)

The West Riding, where I live, is situated in the South Pennine hills. This is the land of the Bronte sisters. Indeed the Bronte parsonage, home to the Bronte sisters, is only a few miles from my home in one direction, and their school a few miles away in the other. The area comprises lots of old mill towns and villages surrounded by beautiful moorland hills. The mills produced the wonderful woollen Yorkshire cloths. Alas most of them have closed now, and the industry is almost dead here.

My childhood home was in Huddersfield, a large mill town. We lived in a very small Victorian mill-worker’s cottage next to a railway, a canal, and the River Colne. Although it was situated in a town, our house was in fact surrounded by woods and fields, and much of my childhood was spent playing in them with my twin-sister and children from neighbouring cottages. We loved climbing trees, acorn fights, wading in the stream, playing on rope swings, sliding down grassy banks, making woodland dens, fishing for ‘tiddlers’, building bonfires, picking blackberries, sledging…

How dreamy, the perfect childhood! I think we all wished we had a twin to play with…and just imagine…living down the street from the Bronte’s!

In the old days of Yorkshire, entire families were involved in the industry of handknitting. A child was just as likely to be taught to knit by their father as by their mother. Who taught you to knit?

Because I am left-handed, I was taught to knit by my left-handed mother. My right-handed sister was instead taught by our grandmother. Like my mother, I knit in the ‘true lefthanded’ style, moving stitches from the right to the left needle. I recently found out that Mum is actually a combination method knitter, like Annie Modesitt but mirrored. I think she must have taught me this way, but somehow I converted to standard style (albeit lefty), probably during my teens when I started knitting a lot from books.

So lucky your mom is left handed too! While your gran could help your sister.

On your website and with your Ravelry group you are carrying on the Yorkshire tradition of Knitting School, tell us a little bit about that history and then what your plans are for your own Knitting School this coming year.

Of course, I am very proud of the knitting heritage we have in Yorkshire! In fact one of the most prized books in my knitting library is ‘The Old Hand-Knitters of the Dales’, written in 1951 by Marie Hartley and Joan Ingilby. It is a very scholastic book, including lots of excerpts from old documents, and transcribed interviews with dalesfolk who were very old at the time the book was written.

Lucky  you– I covet that book!

The wool trade was for many hundreds of years England’s main industry, and was especially important for rural families, who could supplement their meager farming income through knitting for clothing merchants. Knitting was so appreciated as an antidote to poverty that in the late 16th Century knitting schools were founded up and down the country, where children from poor familes were taught knitting. These included one in York, which struggled to take on apprentices. By comparison, knitting schools thrived in rural communities, where there were less trades to compete with. The very isolated valley of Dentdale had four knitting schools!

I founded my own (online) knitting school because I so often come across knitters saying they are scared to take on more advanced knits. While there is much tutorial content on the internet for knitters, it tends to be aimed at the beginner to intermediate level knitter; knit and purl tutorials abound. By comparison comprehensive tutorials for techniques such as wrapping floats in stranded knitting, for example, are extremely difficult if not impossible to find. So my knitting school aims to teach advanced skills to intermediate level knitters, and to extend the skills of those who are already advanced.

At the moment I am concentrating on teaching stranded knitting techniques, having produced a few lessons already to support the KAL for my stranded and steeked slipper design Tess, which I published in November. This year I plan to add tutorials for double-knitting, twisted stitch cables, and various i-cord techniques. I’m also intending to add mirrored versions of all the videos for ‘true lefthanded’ knitters, for whom there is a complete dearth of advanced knitting tutorials online.

Your fabulous new book Novel Knits is inspired by all the reading you did as a child, and your whole life really. I just love the description you give of your childhood household, a Yorkshire cottage stuffed with books. It just sounds so cozy and inviting. Your grandfather’s children’s encyclopedias struck a chord with me,  I grew up with The Book of Knowledge, a series from 1890, which included a memorable illustration of a train going to the moon!

That does sound like a wonderful series of books. Do you still have them? I’ve got our old Children’s Encyclopaedias all neatly arranged on their own shelf on the top landing. It brings back so many lovely memories to look through them.

I think my mom must have them somewhere… I need to find them…

Tell me how Novel Knits, which is arranged in 3 “chapters” Jane Austen, JRR Tolkien and JK Rowling, evolved.

‘Evolved’ is a good word to summarize the process that led to Novel Knits. It feels like the book is the natural consequence of how my design career began and progressed:

I started publishing my own patterns when participating in a series of Harry Potter themed swaps, so most of my early designs were Potter-related. My first was Durmstrang, followed by the four House Pride sock patterns, Luna’s Moonlight socks, and the Fleur Tote.

Then I had the idea for a Jane Austen themed knitting book, and started working up some designs for that (I had outline ideas for 30 projects!). This book was going to present designs relating to the characters and content of Jane’s books, with an introduction to each examining the literary and historical context for the project. Sound familiar?

..Oh dear…

Having decided this I should have been working exclusively on Jane projects. Nevertheless, I was inspired to design some Tolkien-themed knits (Lórien, Lissuin, Lady of the Wood). Consequently I wasn’t making significant progress with the Jane Austen book, and the project began to feel altogether too ambitious. I knew that I wanted to publish a knitting book of some kind though, and preferably one with a literary theme. Casting around for solutions, I wondered if a book featuring some of my existing patterns supplemented with new ones relating to the same authors might be workable. When I mooted this idea with my sister she instantly came up with the title ‘Novel Knits’, and that decided it!

Brilliant!

Later, when Interweave put out a call for submissions for ‘Jane Austen Knits’, I felt an enormous sense of providence! Instead of being in competition with a market leader, I was able to submit to them some of the design ideas that I had abandoned.

Phew…Happy ending!


Left: Lissun @Ann Kingstone Right: Pemberly @Ann Kingstone

I’m of course especially taken with your Fair Isle garments which are just delightful – fresh and modern. There is a bit of traditional two color stranded knitting in Yorkshire isn’t there? Gloves somewhat similar to the more well known Sanquhar gloves of Scotland.

That’s correct! There are some lovely examples in the heritage museums in Hawes and Dent. It seems that they were particular to these northern districts of Yorkshire; Dentdale in particular, as well as Swaledale and Wensleydale. Sadly there are only a very few surviving. The oldest examples have a fringed cuff; they all feature the owners name knitted into a band above the cuff; and several also feature a date in this band. The fingers and palm are in a simple single-stitch chequerboard pattern (changing colour every stitch). Some have this chequerboard dotted with spots where neighbouring stitches are in the same colour. All feature larger stranded patterns on the back of the hand, mostly vertical stripes of diamond or wave patterns.

Charming…I never heard about the fringed cuffs before!

Lady of the Wood Wimple @Ann Kingstone

What I really want for myself from Novel Knits is your Lady of the Wood Wimple, which harks back to a much earlier fashion item! I love how it can be worn with the point in front, or my favorite, the somewhat unusual squared shoulder.

I was determined to design a wimple! It seemed such an obvious accessory for a knitter to have, combining a shawlette, cowl and hood in one garment. Whenever I wear mine I get lots of compliments about it, including comments from knitting doyennes Amy Singer and Debbie Bliss!

You deserve the praise!

I love to travel as much as I love to knit. I think we should have a knitting and walking tour of the Yorkshire Dales, maybe a few train journeys thrown in for knitting time…You can be our hostess? Sounds like a plan?

Let’s talk dates! I think early summer is the best time to enjoy the moors and the dales of Yorkshire. Can you make it anytime then? I live in a fairly spacious late Victorian townhouse with spare rooms…

I’m there! How about 2013?

Now everyone, skip on over to Ann’s website and checkout Novel Knits and her Knitting School!

On Thursday, be sure and stop by Scrumptious Carol Feller’s blog for the next stop on the Novel Knits Blog Tour!

Filed Under: Knitting

« Previous Page
Next Page »

Before Footer

Footer

  • Facebook
  • Instagram
  • Pinterest
  • Twitter
  • YouTube

Mary Jane Mucklestone © 2020