Ah yes you say, “I made your Muckle Mitts and I love them, but I have holes at the corners of the thumb, what did I do wrong?”
Nothing…as Isolda, who has been knitting for over 40 years, since she was a tiny girl in Germany said “There are always holes. We always have holes, even in school we had holes. There are just holes there. We know that. We sewed them up, we still sew them up”.
And that is usually true…the holes are just…there. And yes, you take the tails of your yarn and sew them up.
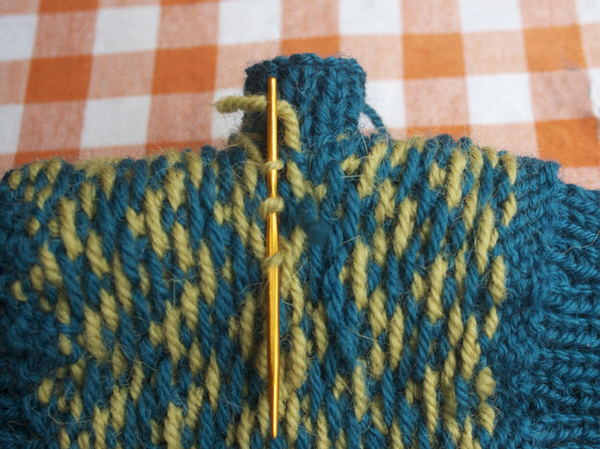
Above First snug up the yarn from the outside, around the hole. You know, follow the stitches along and snug things up with the tip of a tapestry needle.
Above Then turn inside out and using the existing ends if they are long enough, begin to sew. These ends are, typically for me, short. You should try and leave longer tails to give your something to work with. If you can’t work with too tiny tails, use a strand of your Main Color yarn about 8-12 inches long.
Above Now begin stitching carefully around the hole, taking little stitches skimming through the back side of the stitches. You don’t need to poke through to the front like a quilter would.
Above Take small stitches circling the hole, and gently snug things up.
Above Do it with both yarns, then weave in the ends as usual.
Above Like so.
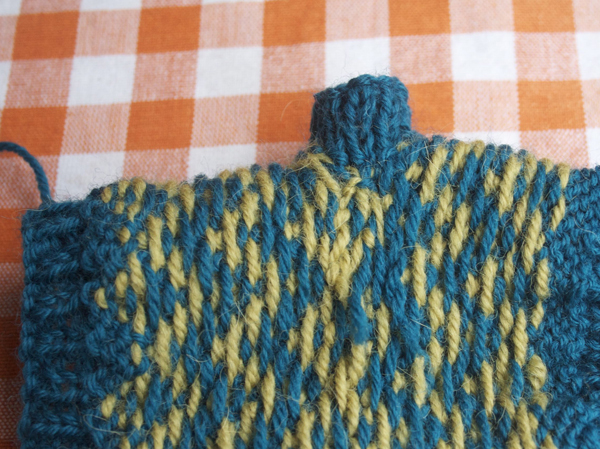
Above Ta Da! No Holes. Now these babies need some serious blocking. Look at that bloated ribbing. Heavens! I’ll wash them lukewarm water with a mild soap, rinse in water of the same temperature, gently press the moisture out, shape my mitts into right and left hand, then dry flat.
Tutorials in the Afterthought Thumb Series:


What a simply fabulous set of instructions!!!! and pictures. Now maybe I have the courage to go back and finish my wonderful fair isle socks- picking up the waste yarn heels and toes! THANKS!
Thank your for this tutorial. I thought I was sloppy or did something wrong because I have holes around the thumbs. Now I don’t feel so bad about snugging them up!
You’re so good MJ 🙂 You should do a book on finishing details, especially finishing details for Fair Isle knits; I don’t think anyone has ever done that. Love your attention to detail here. You have a way of putting people at ease 🙂
Ah, I always hear, “Your stitches are so neat!” The secret is in these careful finishing steps. Makes us look like fancy knitters! (I mean, we are fancy knitters, made even fancier with tricks like these!)
Hooray for fancy knitters! Now everyone can be a fancy knitter just by practicing careful finishing techniques!
And Beth my dear, you are the one who made me fall in love with proper finishing, these mitten “holes” in particular.
Randi, never feel bad about your knitting. It is all good, even the bad!
Bridget! You’ll wear those socks yet!
The tail tells the tale of a cunning knitter.
yes my dear ellen, just manipulate your needle before you thread it…that is the secret of tiny tails.
Finding this page has been such a huge relief! Like others, I thought I must be the worst knitter in the world for not being able to knit fingers without holes. Self-doubt is an ugly thing, especially when it’s your hobby for crying out loud!
This made my week.
Thank you!!
Nice tutorial! I love how puffy the mitt looks when it’s inside out.
oh that makes me feel SO much better! i thought was just not skilled enough when i finished my fingerless mitts and discovered very unattractive holes around the thumb joining. yippee! and thanks for sharing.
This is great! I sometimes have holes when do socks, so now I know how to fix it! thanks.
Lovely friendly, helpful instructions. Just one thing. Don’t quite get “Take small stitches circling the hole and gently snug things up”. Shouldn’t I be stitching across the hole at this stage, to close the gap?